Your microphone stays silent during video calls. Recording software shows no input. The system acts like no mic exists at all. This frustration hits Windows users regularly, whether the device is built-in, USB, or a headset. The good news is most cases stem from simple settings, permissions, drivers, or connections rather than broken hardware.
This guide walks through practical ways to restore detection. You will find clear steps drawn from official Microsoft support guidance plus common real-world fixes that work consistently. Follow them in order and test after each one. Most people regain full microphone function without buying new gear.
How to Resolve Microphone Detection Problems
Microphone detection failures rarely involve one single cause. Privacy locks block apps. Drivers fall out of date after updates. Ports get dusty or mismatched. Audio services stall in the background. Hardware can also fail, though less often than software issues.
Start with the basics and move toward deeper fixes. Test your mic after every change by speaking into it while watching the input level meter in system sound settings. Open Settings → System → Sound. Movement in the level bar confirms the device is live. Keep other apps closed during testing so nothing else claims exclusive access.
1. Check Physical Connections and Hardware Basics
Loose plugs and simple hardware oversights create more detection failures than most people expect. A USB mic that sits half-seated or a headset jack pushed into the wrong port never registers. Physical mute switches also silence input without any on-screen warning.
Begin here before touching software. These checks take only a minute and often solve the entire problem.
- Unplug the microphone or headset completely. Wait ten seconds. Plug it back in firmly. Try a different USB port if the device uses USB, preferably one directly on the motherboard rather than a hub.
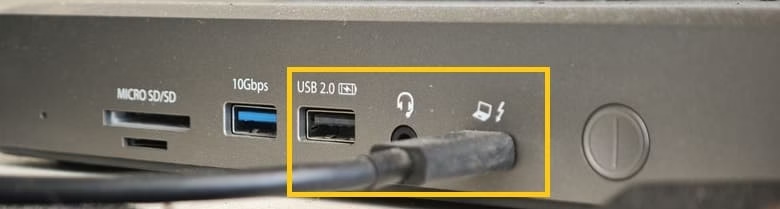
- Look for a physical mute button on the headset cable, boom, or base unit. Toggle it off.
- For wired headsets with a single plug, confirm the jack type matches. Many headsets use a four-contact TRRS connector. Separate green and pink jacks on a desktop need a splitter. A combo jack accepts the single plug directly.
- Test the same microphone on another computer or phone if available. Success on the second device points the problem at your original system rather than the mic itself.
- Clean the ports gently with a dry soft brush. Dust or lint can block contact.
These steps follow the practical advice found across Microsoft hardware troubleshooting pages. They eliminate the most common physical barriers quickly.
2. Verify Microphone Permissions and Privacy Settings
Modern operating systems lock microphone access by default for privacy. After a Windows update the toggles sometimes reset. An app then reports no microphone even though the hardware works fine in system tests.
Permissions form one of the top reasons a mic appears missing inside specific programs such as Zoom, Teams, browsers, or recording software. Correcting them restores detection for both Store apps and desktop programs.
- On Windows 11 open Settings → Privacy & security → Microphone.
- Turn on Microphone access.
- Turn on Let apps access your microphone.
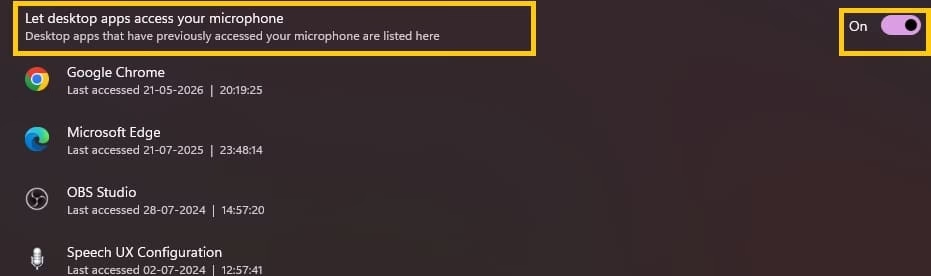
- Also enable Let desktop apps access your microphone so programs outside the Microsoft Store can use the device.
- Scroll the app list and enable the specific applications you need.
- Restart the computer after changing permissions so the new rules take full effect.
Microsoft Support lists these exact privacy toggles as the first software check after a Windows 11 update. Once permissions sit correctly, most apps detect the microphone at once.
Also know: Fix Black Screen on Startup in Windows 11
3. Select the Correct Input Device in Sound Settings
Windows can list several input devices at once. The system may default to a disabled webcam mic, a Bluetooth device that is powered off, or a previous headset. Your preferred microphone then stays invisible to apps even though it appears in Device Manager.
Choosing the right input and raising its volume often brings the level meter back to life.
- Open Settings → System → Sound.
- Under Input, open the device list and select your microphone.
- Click the arrow next to it. Raise the input volume slider.
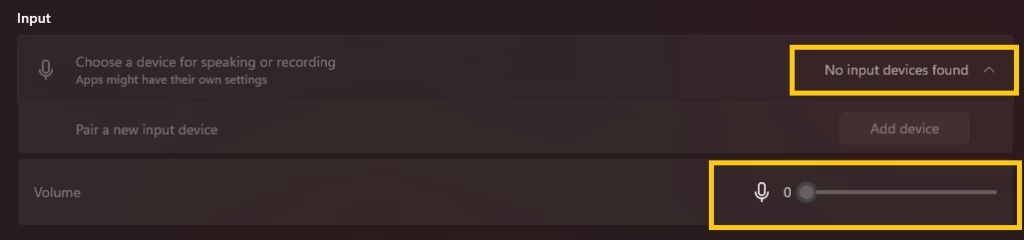
- Use the Test button and speak. Watch for movement in the meter.
- Right-click the speaker icon in the taskbar, choose Open Sound settings, then scroll to More sound settings.
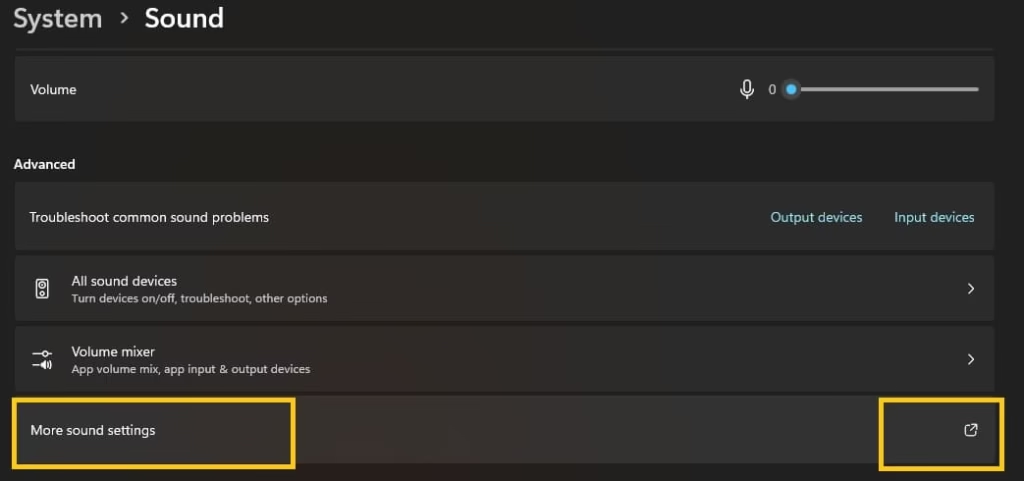
- Open the Recording tab. Right-click empty space and enable Show Disabled Devices plus Show Disconnected Devices.
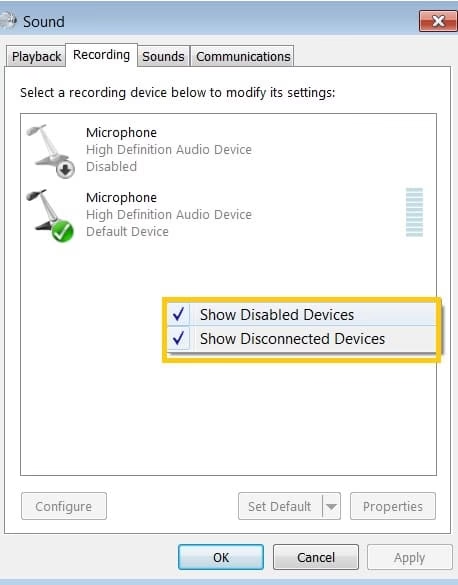
- Enable any grayed-out microphone that belongs to you and set it as default.
These steps match the official sound configuration paths on Windows. Hidden or disabled devices surface here more often than expected after system updates or device swaps.
4. Update or Reinstall Audio Drivers
Outdated, corrupted, or generic drivers stop Windows from recognizing a microphone. Feature updates sometimes replace manufacturer drivers with basic Microsoft ones that lack full support.
Refreshing the driver layer resolves many cases where the mic never appears in sound settings.
- Right-click Start and open Device Manager.
- Expand Audio inputs and outputs plus Sound, video and game controllers.
- Right-click your audio device or microphone and choose Update driver.
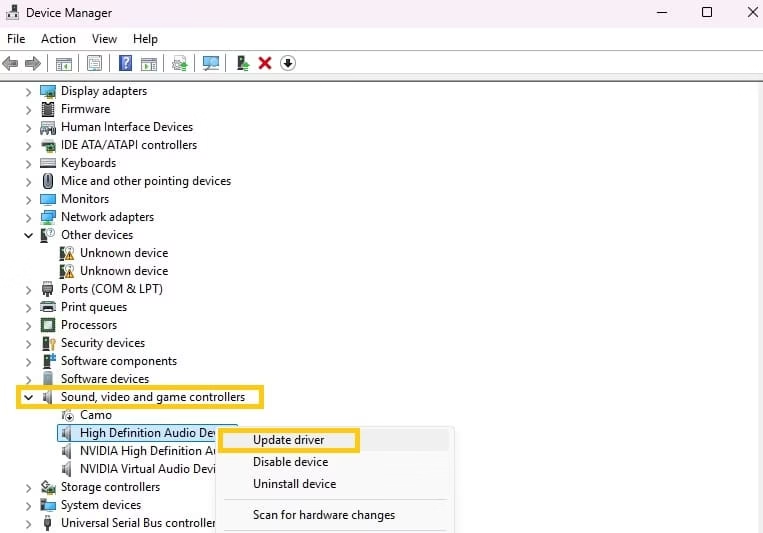
- Select Search automatically for drivers.
- If the update finds nothing useful, right-click the device again and select Uninstall device. Check the box that removes the driver software when it appears. Restart the computer. Windows reinstalls fresh drivers automatically.
- If needed, return to Device Manager, right-click the Sound section, and choose Scan for hardware changes.
- Download the latest audio package directly from your laptop, motherboard, or microphone manufacturer site when automatic updates fail. Install it and restart.
Microsoft Support recommends the uninstall-and-reinstall path precisely when Windows fails to detect the headset or microphone at all. The process restores communication between hardware and the operating system in the majority of driver-related cases.
Also know: Best Sound Software for Better Gameplay in 2026
5. Run the Built-in Audio Troubleshooter
Windows includes diagnostic tools that scan for common configuration errors. The Windows audio troubleshooter often corrects service states, default devices, and basic driver conflicts without manual work.
Running it early saves time when the cause remains unclear.
- On Windows 11 open Settings → System → Troubleshoot → Other troubleshooters.
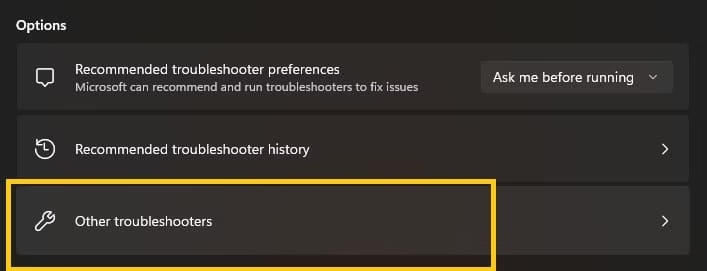
- Find Audio or Recording Audio and select Run. Follow the on-screen prompts and apply any recommended fixes.
- Alternatively open Settings → System → Sound. Scroll to Advanced and choose the option to troubleshoot common sound problems for input devices.
Microsoft documents the Recording Audio troubleshooter as an effective first automated step. Many users report the tool restores detection after a recent update or service interruption.
6. Restart Windows Audio Services
Background services sometimes stop responding after heavy use, sleep cycles, or updates. When Windows Audio or related services hang, no input device registers even with correct drivers and permissions.
A quick restart of the services clears the blockage.
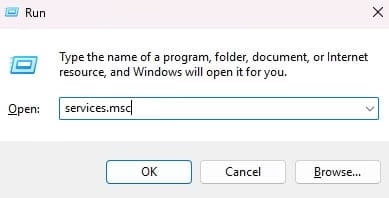
- Press Windows key + R. Type
services.mscand press Enter.
- Locate Windows Audio, Windows Audio Endpoint Builder, and Remote Procedure Call.
- Right-click each and choose Restart.
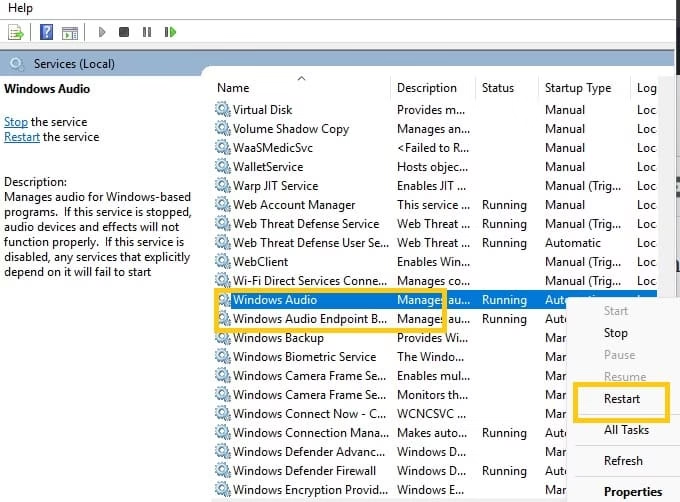
- Close the window and test the microphone again.
This method appears consistently in detailed Windows troubleshooting guides and restores function when the services have stalled without any other obvious fault.
Also know: How to Get Visual Alerts Instead of Sounds in Windows
7. Test Exclusive Mode and App Conflicts
Some applications seize exclusive control of the microphone and block everything else. Games, streaming software, or older voice chat tools can leave the device locked after they close.
Disabling exclusive mode frees the mic for shared use.
- Open Sound settings → More sound settings.
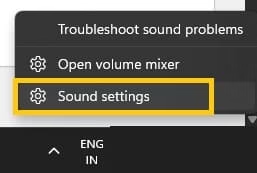
- On the Recording tab double-click your microphone.
- Open the Advanced tab.
- Uncheck both boxes under Exclusive mode. Apply the change.
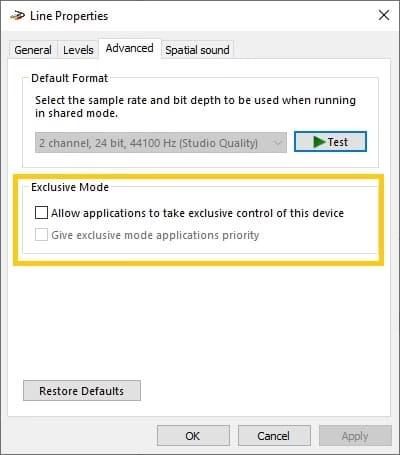
- Close every open app that might use audio. Restart the computer. Test again in a simple recording app or the system sound test.
This adjustment solves intermittent detection failures that only appear inside certain programs.
8. Force Detection with a Temporary USB Audio Adapter
When a 3.5 mm headset refuses to appear despite correct jack matching, drivers, and permissions, a low-cost USB sound adapter often forces the system to create a fresh audio endpoint. The adapter presents itself as a new USB audio device, bypassing problematic onboard jacks or Realtek detection quirks.
Many technicians keep a simple USB-to-3.5 mm adapter for exactly this purpose. Plug the headset into the adapter, then plug the adapter into a USB port.
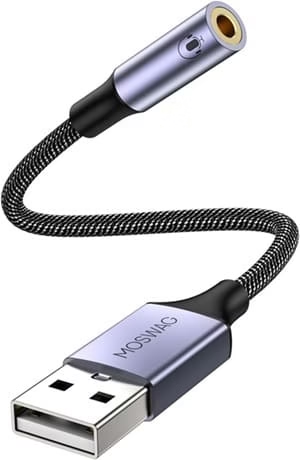
Windows treats it as a separate device. Select it under Input in sound settings. Once the microphone works through the adapter you know the original jack or onboard codec was the weak link. You can continue using the adapter or pursue a motherboard driver reinstall knowing the hardware itself is sound.
This workaround appears in practical hardware forums and support communities as a reliable isolation step that avoids deeper disassembly.
After applying any of the above methods, test thoroughly. Speak at normal volume. Check levels in system settings and inside the actual apps you use daily. If the microphone still fails to appear after exhausting software and connection steps, the device itself may need replacement or professional diagnosis.
Pro Tip – Use Mobile Phone for Microphone
In important meetings like on Microsoft Teams it’s really important to have clear sound and voice. If you are getting microphone disconnecting error in meeting, then using your mobile phone as microphone is the best way to continue the meeting.
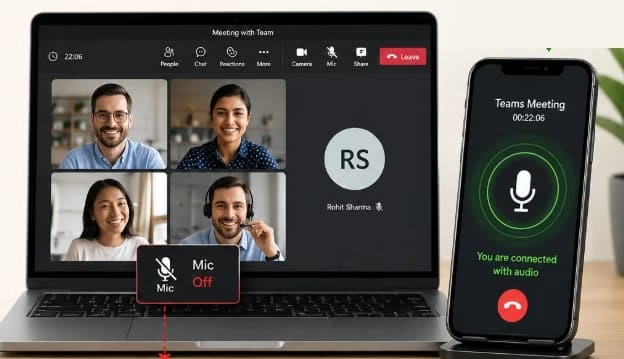
Join the same meeting with your mobile phone and use only the microphone, disable microphone on your Windows laptop. This hack will give you the best connection for the meeting.
Also know: Link Microsoft Account to Digital License Windows
Conclusion
Microphone detection problems look intimidating at first glance yet almost always resolve with methodical checks. Physical connections, privacy permissions, correct input selection, driver refreshes, and service restarts cover the vast majority of cases. Official guidance from Microsoft confirms the same sequence works across current Windows versions.
Work through the steps calmly. Test after each change. Most users regain reliable detection within fifteen to thirty minutes. Keep the privacy toggles and default input device in mind after future system updates, since those two settings drift most often. With the microphone restored you can return to clear calls, clean recordings, and uninterrupted work.
Related:
How Enabling Microphone for Specific Apps Works in Windows
Troubleshooting Microphone Privacy Settings in Windows 11

Amanda Starc
Amanda is a dedicated technical web content writer with a passion for transforming complex ideas into compelling and accessible online narratives. With a background in web development, and digital Marketing I bring a unique blend of technical expertise and creative storytelling to the digital domain.
