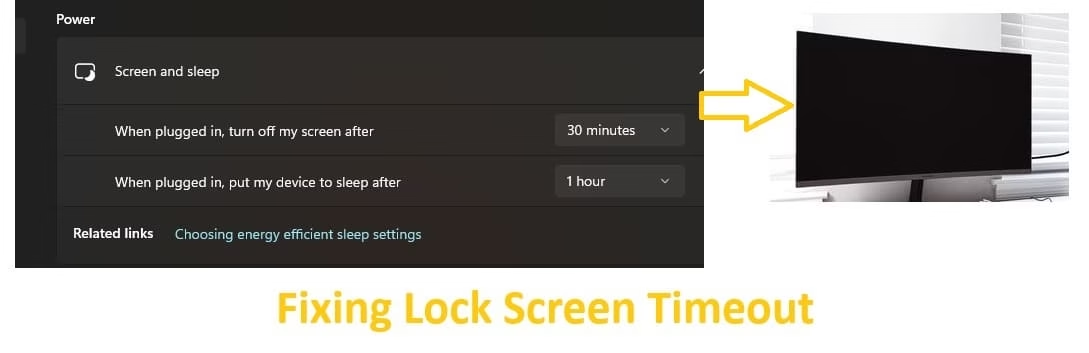
Are you tired of your Windows PC locking the screen every few minutes while you’re still using it? One moment you’re reading an email, watching a tutorial, or taking notes, and the next thing you know, you’re staring at the lock screen asking for your PIN or password. This common frustration affects thousands of Windows 11 and Windows 10 users every day.
In this complete guide, we’ll walk you through everything you need to know about lock screen timeout issues. We’ll start with why this happens, explore the real benefits of adjusting your timeout settings, and then share the top 3 proven methods that actually work. Each method includes clear, step-by-step instructions so even beginners can follow along easily.
Whether you’re working from home, studying late at night, or just want fewer interruptions, you’ll find practical solutions here. These tips are based on trusted Microsoft recommendations and real user-tested fixes. By the end, you’ll have full control over when your screen locks and how your PC behaves during inactivity. Let’s get your Windows experience running smoother.
Why Your Lock Screen Times Out Too Quickly
Before jumping into fixes, it helps to understand the problem. Windows has several power-saving features that work together. The system doesn’t just turn off your screen — it also locks it for security reasons.
By default, many Windows 11 and 10 setups lock the screen after 5 to 10 minutes of inactivity. This is especially common on laptops to save battery. Corporate or school devices often have stricter group policies that force quick timeouts.
Other causes include:
- Power plans set to “Balanced” mode
- Dynamic Lock feature detecting when you walk away
- Screensaver settings linked to locking
- Outdated drivers or recent Windows updates changing behavior
Understanding these reasons makes it easier to choose the right fix for your situation.
Benefits of Using Lock Screen Timeout
Getting the right lock screen timeout setting offers several practical advantages. It’s not just about convenience — it affects security, battery life, and your overall daily experience.
- Stronger Security: A proper timeout automatically locks your computer when you step away. This protects sensitive files, work documents, banking info, and personal photos from prying eyes, especially in shared offices or public spaces.
- Improved Battery Life on Laptops: Shorter timeouts help save power by turning off the display sooner. This becomes very useful during travel or when you’re away from a power outlet.
- Prevents Screen Burn-in: Modern OLED and older LCD screens can develop ghost images if left on too long with static content. A good timeout reduces this risk and extends your monitor’s lifespan.
- Reduces Distractions and Boosts Focus: Frequent lock screens break your concentration. Setting a longer timeout lets you stay in flow while reading long articles or following video guides.
- Better Productivity at Home: Many remote workers prefer 15–30 minute timeouts. It gives enough time for coffee breaks or quick household tasks without constantly typing passwords.
- Customized Workspace Control: You can set different behaviors for plugged-in vs. battery use. This flexibility helps balance security and comfort based on your location and routine.
- Peace of Mind in Shared Environments: Families, roommates, or office colleagues won’t accidentally access your open tabs and apps.
Finding the sweet spot between security and convenience makes a big difference in how you feel about your PC every day.
Top 3 Methods to Fix Early Lock Screen Timeout in Windows
Here are the three most effective ways for fixing lock screen timeout in both Windows 11 and Windows 10. We recommend starting with Method 1.
1. Adjust Screen and Sleep Settings (Easiest Method)
This is the quickest and safest method for most people. It works directly through Windows Settings.
Steps:
- Press the Windows key + I together to open the Settings app quickly.
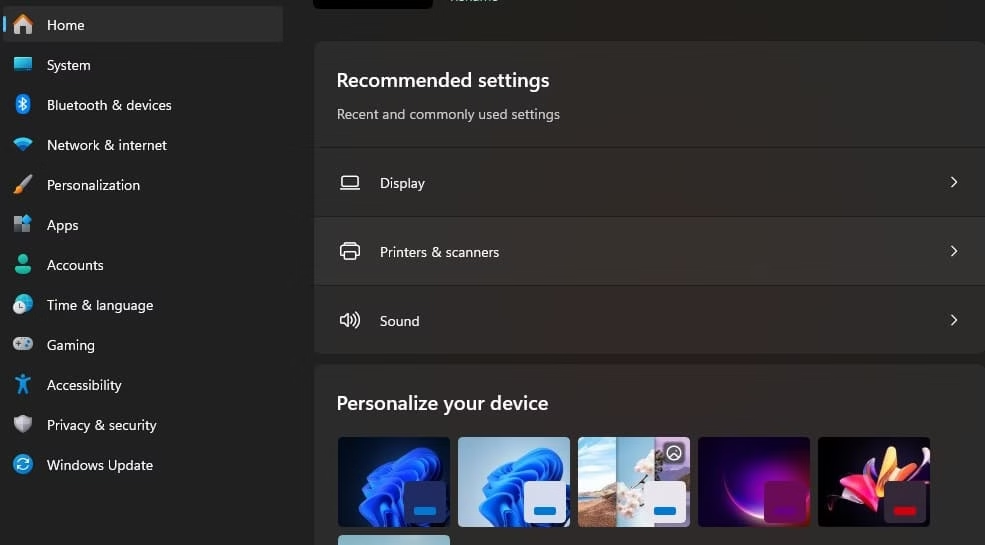
- Click on System in the left sidebar.
- Select Power & battery (Windows 11) or Power & sleep (Windows 10).
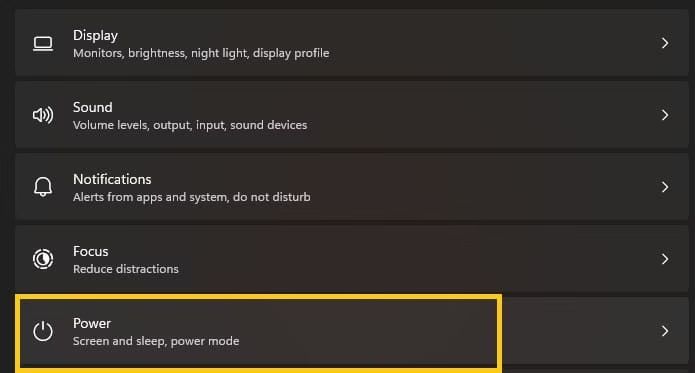
- Scroll down until you see the Screen and sleep section.
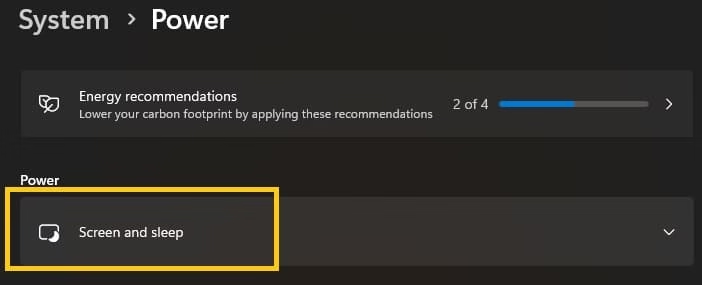
- Look for “When plugged in, turn off my screen after.”
- Click the drop-down menu and choose a longer time — try 15 minutes, 30 minutes, or even Never.
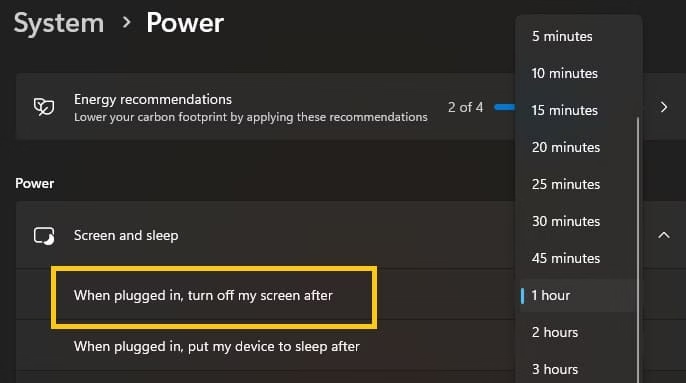
- Do the same for “When plugged in, put my device to sleep after.”
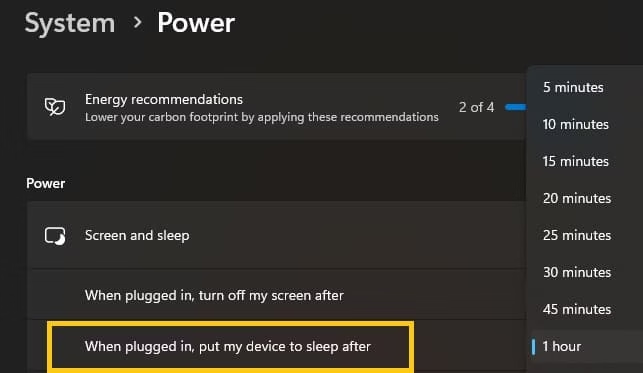
- If you use a laptop, also adjust the “On battery power” options according to your needs.
- Close the Settings window.
- Test it by leaving your PC idle for a while and see if the screen stays on longer.
Extra Tips: If you’re on Windows 11, you can also access these settings faster by searching “Power & sleep” in the Start menu. Always test changes during the day first. This method usually solves the issue for 70-80% of users.
Best For: Beginners, home users, and anyone who wants fast results without advanced tools.
Also know: Easy Ways to Sync Refresh Rates for Smooth Playback Windows 11/10
2. Change Console Lock Display Off Timeout (Advanced Power Option)
This hidden setting specifically controls what happens when your PC is already on the lock screen.
Steps:
- Right-click the Start button and choose Terminal (Admin).
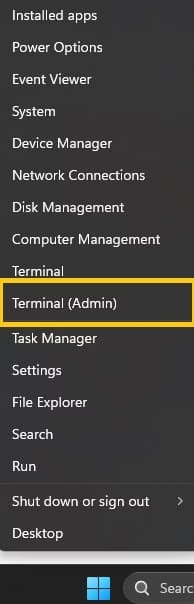
- Copy and paste this command, then press Enter: powercfg -attributes SUB_VIDEO 8EC4B3A5-6868-48c2-BE75-4F3044BE88A7 -ATTRIB_HIDE
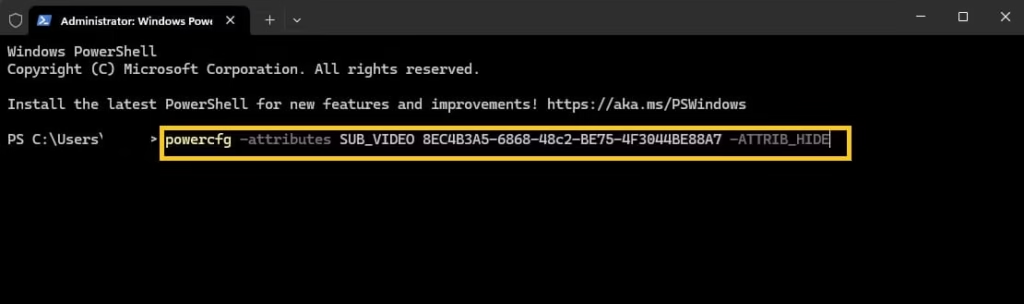
- Close the admin window.
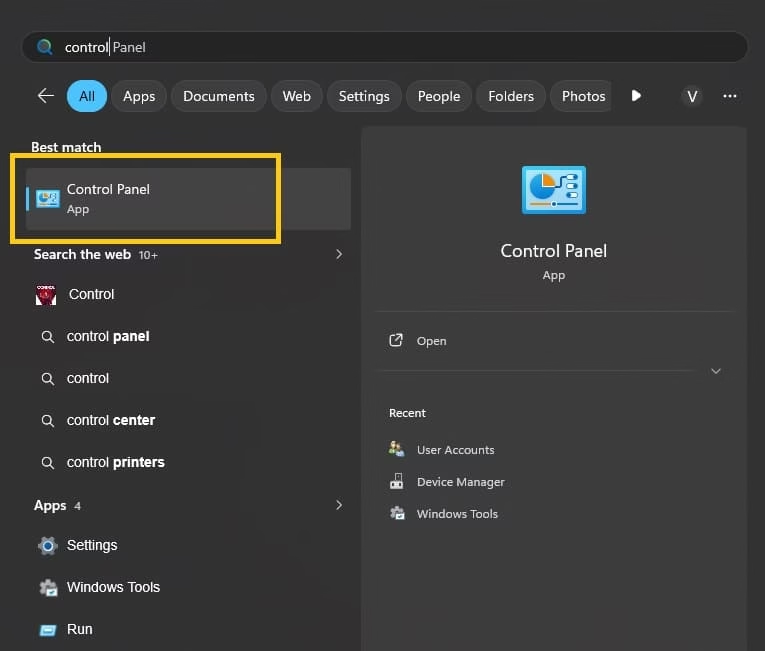
- Open Control Panel (search for it in Start menu).
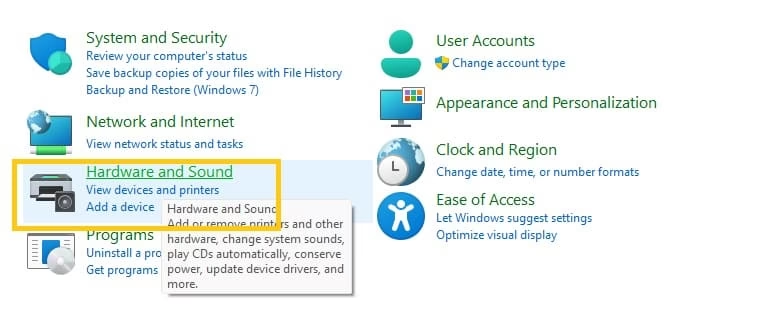
- Go to Hardware and Sound.
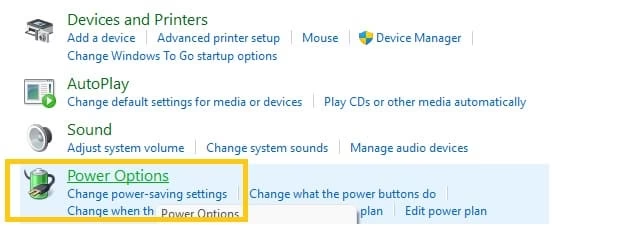
- Now click on Power Options.
- Click Change plan settings next to your current power plan (usually Balanced).
- Click Change advanced power settings.
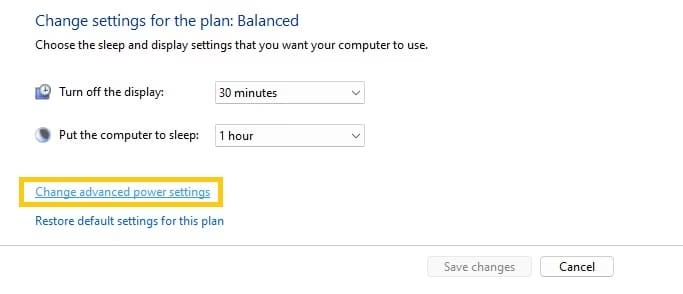
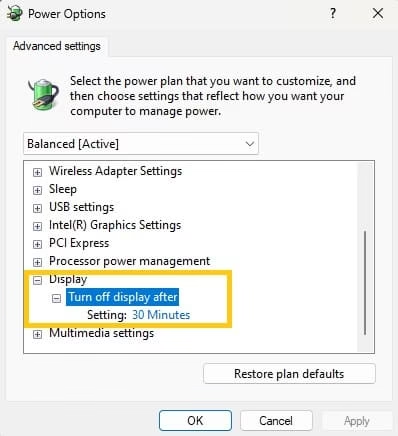
- In the new window, expand the Display category.
- Find Console lock display off timeout.
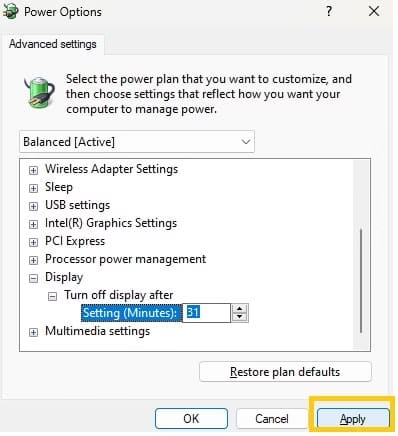
- Change the minutes to your desired value (example: 30 for 30 minutes, or 0 for never).
- Click Apply, then OK.
- Restart your computer to make sure the change takes effect.
Extra Tips: To hide the option again later, run the same command but replace -ATTRIB_HIDE with +ATTRIB_HIDE. Be careful with this method — only use it if Method 1 isn’t enough. Create a System Restore point first (search “Create a restore point” in Start).
Best For: Users who need precise control, especially when the screen turns off after locking.
3. Use Screensaver Settings to Control Lock
This classic method links your screensaver to the lock screen behavior.
Steps:
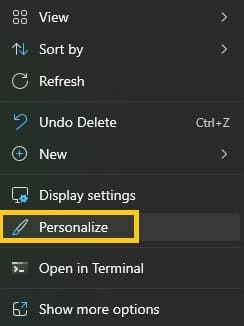
- Right-click on an empty area of your desktop and select Personalize.
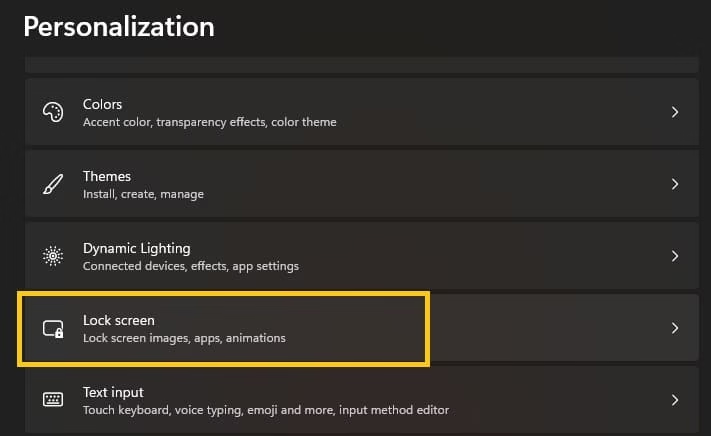
- Click Lock screen from the left menu.
- Scroll down and click Screen saver settings.
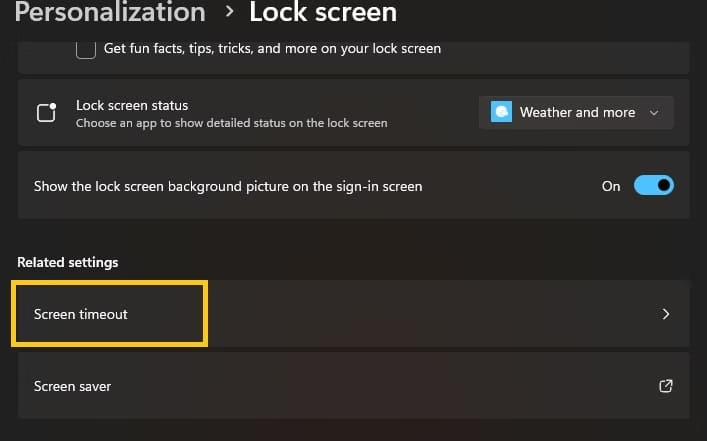
- In the dropdown, choose a screensaver (you can pick “None” if you don’t want visuals).
- Set the Wait time to the number of minutes you prefer (such as 10 or 20).
- Check the box that says On resume, display logon screen.
- Click Apply.
- Click OK to save everything.
- Leave your PC idle to test the new timeout.
Extra Tips: Some users prefer a blank screensaver for minimal distraction. This method is especially useful if you want the screen to lock automatically after inactivity.
Best For: People who like visual screensavers or need reliable locking behavior.
Bonus Tips and Troubleshooting
If the above methods don’t fully solve the issue, try these additional steps:
- Turn off Dynamic Lock in Settings > Accounts > Sign-in options.
- Update your graphics drivers through Device Manager.
- Check for active group policies if you’re on a work PC (contact your IT team).
- Use PowerToys Awake utility from Microsoft for temporary prevention of sleep.
Best Practices for Lock Screen Settings
- Start with 15 minutes and adjust based on your routine.
- Use different settings for battery vs. plugged-in use.
- Combine methods for best results.
- Always prioritize security in public places.
Also know: Easy Ways to Run a Troubleshooter for PC Issues Windows 11
Conclusion
Fixing lock screen timeout in Windows 11 and Windows 10 is easier than most people think. With the simple steps shared in this guide, you can customize your PC to match your lifestyle and needs. Start with the easiest method and work your way down if necessary.
Remember to test changes carefully and keep your system updated. A well-adjusted lock screen timeout improves both your productivity and peace of mind.
Thanks for reading! If you found this helpful, feel free to share your experience in the comments. Enjoy your smoother Windows experience.

