Deleted files pile up in the Recycle Bin and quietly eat drive space. Over time this slows performance and leaves less room for updates or new files. Emptying the bin permanently removes those items and frees the space at once. This article walks through the clearest, safest ways to empty the Recycle Bin in Windows 11. Every method draws from Microsoft’s own tools and guidance so you can clean up with confidence.
Emptying Recycle Bin in Windows 11
Windows keeps deleted files in the Recycle Bin so you can restore them if needed. Once you empty the bin those files are gone for good from the drive. Microsoft offers several built-in paths that range from a simple right-click to automatic cleanup on a schedule. The steps below stay straightforward and work on both laptops and desktops. Choose the method that fits how often you clean and how much control you want.
1. Empty the Recycle Bin from the Desktop Icon
This remains the quickest everyday method. Microsoft places the Recycle Bin on the desktop by default so you can clear it without opening any menus. A single right-click handles the job and asks for confirmation before permanent deletion. It works even when the bin holds files from multiple drives. Use this route whenever you notice the icon looks full or after a big cleanup session.
- Locate the Recycle Bin icon on your desktop.
- Right-click the icon.
- Select Empty Recycle Bin from the menu.
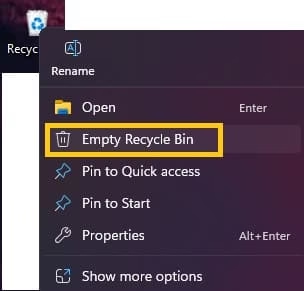
- Confirm the action when Windows asks if you want to permanently delete the items.
- Wait a moment while the files disappear and the space returns to your drive.
If the icon is missing, right-click the desktop, choose View, and make sure Show desktop icons is checked. You can also restore the icon under Settings > Personalization > Themes > Desktop icon settings.
Also know: Fixed: Out of Range Input Signal Error in Windows Monitor
2. Empty the Recycle Bin from Inside File Explorer
Opening the Recycle Bin lets you review its contents before clearing everything. Microsoft includes an Empty Recycle Bin button at the top of the window for this purpose. You can also select individual files and delete only those you no longer need. This method suits people who want a final look at what they are about to remove.
- Double-click the Recycle Bin icon on the desktop or type Recycle Bin in the File Explorer address bar and press Enter.
- Review the list of files if you wish.
- Click the Empty Recycle Bin button near the top of the window.
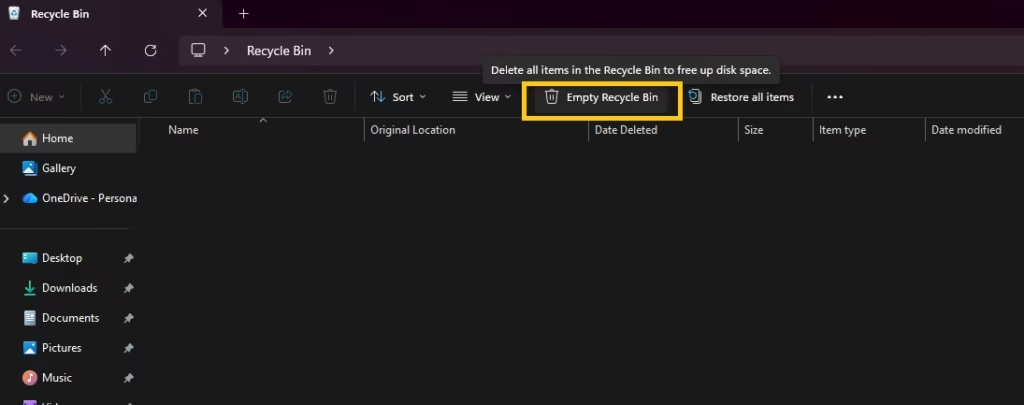
- Confirm the permanent deletion when prompted.
- Close the window once the process finishes.
You can also select specific items, press Delete, and leave the rest in the bin for later recovery.
3. Use Storage Settings and Cleanup Recommendations
Windows 11 includes a Storage page that surfaces temporary files, including those sitting in the Recycle Bin. Microsoft’s Cleanup recommendations tool lists the space you will regain and lets you empty the bin with a few clicks. This path works well when you are already checking overall drive space.
- Press Windows key + I to open Settings.
- Select System then Storage.
- Click Cleanup recommendations or Temporary files.

- Check the box next to Recycle Bin if it appears.
- Review any other suggested items and select only what you want to remove.
- Click the Clean up or Remove files button and confirm.
This method also shows how much space the bin currently occupies so you can decide whether a full empty is worth it right now.
4. Set Storage Sense to Empty the Recycle Bin Automatically
Storage Sense is Microsoft’s built-in automatic cleanup tool. You can tell it to remove files from the Recycle Bin after a set number of days. Once configured, Windows handles the emptying on a schedule without further action from you. This unique approach keeps the bin from growing large in the background and frees space on a regular basis. Many users never explore these settings, yet they deliver steady long-term results.
- Open Settings with Windows key + I.
- Go to System then Storage.
- Turn Storage Sense on if it is off.
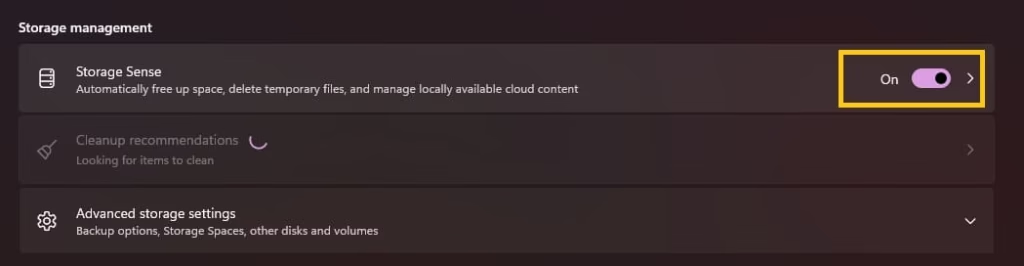
- Click Storage Sense to open its options.
- Under Configure cleanup schedules, set how often Storage Sense should run (daily, weekly, monthly, or when space is low).
- Find the option for Delete files in my recycle bin if they have been there for over.
- Choose 1 day, 14 days, 30 days, or 60 days according to your comfort level.
- Optionally run Storage Sense now to clear the current contents immediately.
- Close Settings. The schedule takes effect from that point forward.
This method turns a recurring chore into a set-and-forget habit. Pair it with shorter retention times if drive space is tight, or longer times if you often restore deleted files.
A few extra notes help the process stay reliable. Emptying the Recycle Bin is permanent, so double-check important files before you confirm. Files deleted with Shift + Delete bypass the bin entirely and cannot be recovered this way. On systems with multiple drives each drive keeps its own Recycle Bin folder, yet the desktop empty command usually covers them all. If the bin refuses to empty, a quick restart or running Disk Cleanup often clears the issue.
Also know: Resolving Microphone Detection Problems on Windows
What to do if the Recycle Bin will not empty
Sometimes the bin refuses to clear. A simple restart often fixes temporary locks on files. Close any open apps, restart your PC, then try emptying again.
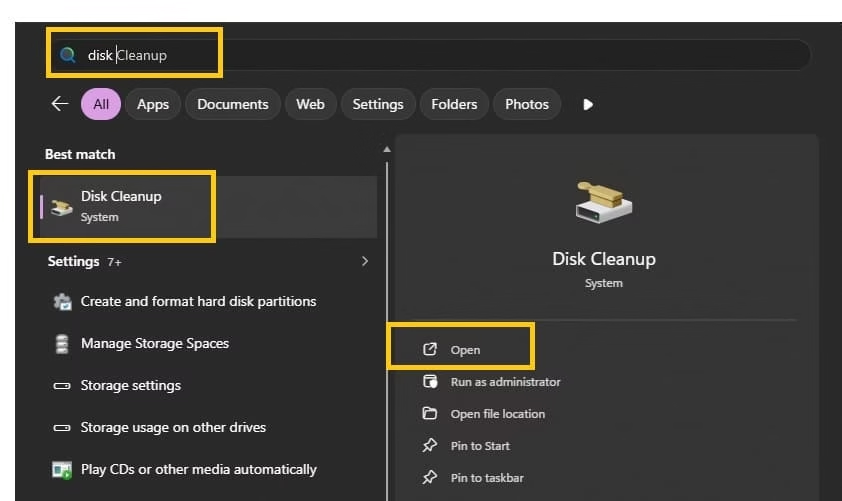
1. If it still will not empty, open Disk Cleanup. Search for Disk Cleanup in the Start menu, select your main drive, check the Recycle Bin box, and run the cleanup. This bypasses the normal empty command in many cases.
2. As a stronger option, open Command Prompt as administrator (search for cmd, right-click, choose Run as administrator) and type this command carefully, then press Enter:
rd /s /q C:$Recycle.Bin
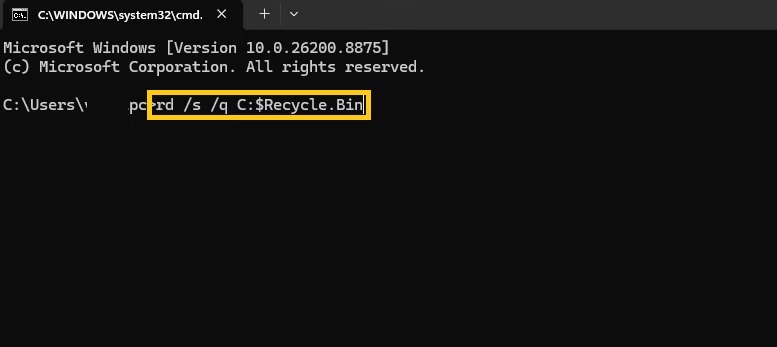
Replace C with the letter of any other drive if needed. Restart afterward. Windows will create a fresh empty Recycle Bin folder. Only use this if the simpler steps fail, and make sure you type the path exactly.
A few final notes keep the process safe. Emptying the Recycle Bin is permanent, so double-check important files before you confirm. Files deleted with Shift + Delete skip the bin entirely and cannot be recovered this way. On systems with multiple drives each drive has its own Recycle Bin folder, yet the desktop empty command usually covers them all.
What Files Can’t be Delete from Recycle Bin
Files that are already in the Recycle Bin can usually be deleted, but certain situations prevent Windows from removing them. There is no specific file type (like .exe, .dll, or photos) that is permanently un-deletable — the problem is almost always related to locks, permissions, or corruption.
So here are some types of files that won’t delete from the Recycle Bin:
- Another program, process, or background service still has the file open.
- You don’t have full rights to delete the file (common with files from another user account or system-related items).
- The hidden $Recycle.Bin folder on the drive has become inconsistent or damaged.
- Names containing invalid characters, trailing spaces/periods, or reserved Windows names (e.g., CON, LPT1, AUX).
So if these kind of files are not deleting then don’t bother just restart your pc and then try again to empty recycle bin.
Conclusion
Emptying the Recycle Bin in Windows 11 is a simple way to reclaim drive space and keep the system running smoothly. The desktop right-click and File Explorer button handle quick cleanups. Storage settings give you a clear view of the space involved. Storage Sense adds an automatic schedule that removes old deleted files without extra effort. Choose the method that matches your routine, empty the bin when it fills up, and enjoy the extra room on your drive.
Related:
Free Up Storage Space Effectively Windows 11/10
Working Ways to Clear DirectX Shader Cache in Windows
Clear Space to Run Games Smoothly on PC

Amanda Starc
Amanda is a dedicated technical web content writer with a passion for transforming complex ideas into compelling and accessible online narratives. With a background in web development, and digital Marketing I bring a unique blend of technical expertise and creative storytelling to the digital domain.
