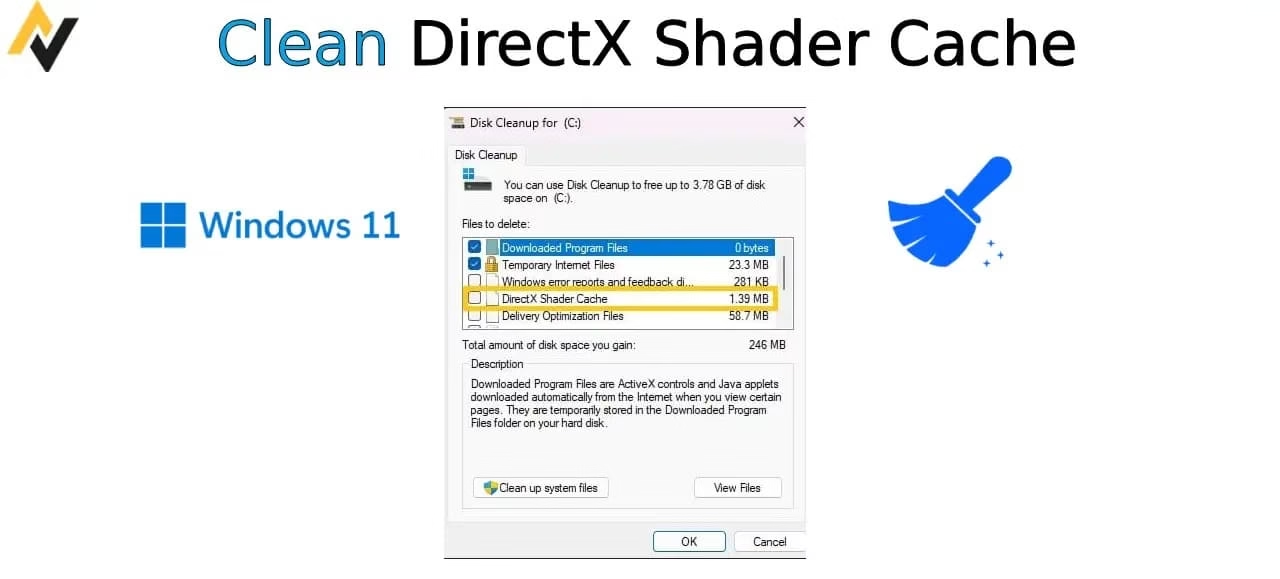
Games and graphics-heavy apps sometimes develop annoying stutters or take forever to load. Your search for DirectX Shader Cache likely comes from chasing smoother gameplay or freeing up disk space. These cached files store pre-compiled shaders to speed things up, but they can grow large, become corrupted, or cause conflicts after driver updates.
In this article, we explore exactly why clearing the cache helps and walk you through several proven methods. Each approach includes clear explanations so you understand the process. Whether you use an NVIDIA, AMD, or Intel setup, these steps work across Windows 10 and 11. Follow along carefully, and you will notice improved responsiveness in many cases.
Ways to Clean DirectX Shader Cache
Multiple reliable techniques exist to clear the DirectX Shader Cache. Some suit beginners while others offer deeper cleaning for advanced users. Start with the easiest option and progress if needed. Always restart your PC afterward to let fresh cache files rebuild naturally during gameplay.
Each method comes with background details so you know what to expect and why certain precautions matter. Clearing the cache remains safe because Windows and your games recreate necessary files over time.
1. Use Built-in Disk Cleanup Tool
Windows includes a straightforward utility that targets the DirectX Shader Cache directly. This method proves quick and requires no extra software. Many users prefer it for regular maintenance.
The tool scans your drive and lists temporary files including shader data. Selecting only the shader cache keeps other important files untouched.
- Press the Windows key and type Disk Cleanup in the search bar.
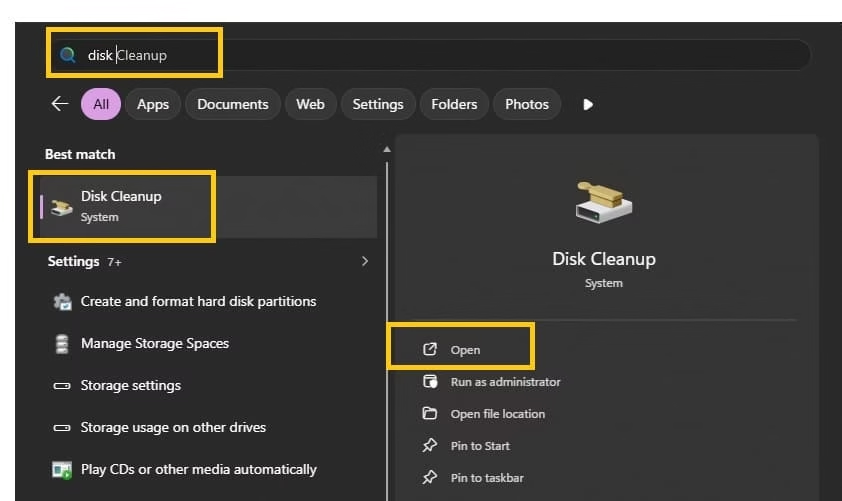
- Open the app and select your main drive, usually C.
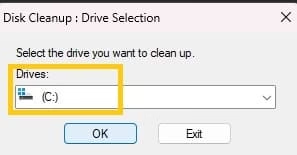
- Click OK and wait while it calculates space.
- In the list of file types, check the box next to DirectX Shader Cache.
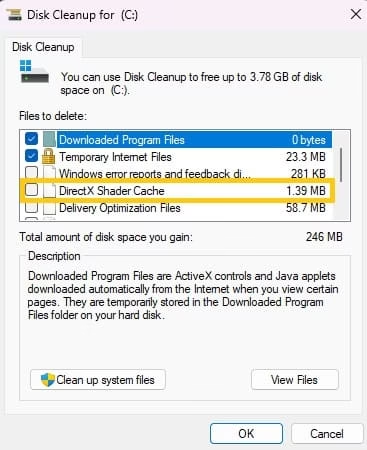
- Leave other options unchecked unless you want additional cleanup.
- Click OK, then confirm Delete Files.
- Allow the process to finish completely before restarting your computer.
This approach works well for occasional cleaning. It often frees several gigabytes without affecting your personal data or installed programs.
2. Clear Through Windows Storage Settings
Modern Windows versions offer a more visual way to manage temporary files. This method feels intuitive and integrates nicely with system settings.
It provides similar results to Disk Cleanup but presents options in a cleaner interface. Use it when you prefer graphical navigation over classic tools.
- Open Settings by pressing Windows key + I.
- Navigate to System and then click Storage.

- Under the Storage management section, select Temporary files.

- Scroll through the list and check DirectX Shader Cache.
- Click the Remove files button at the top.
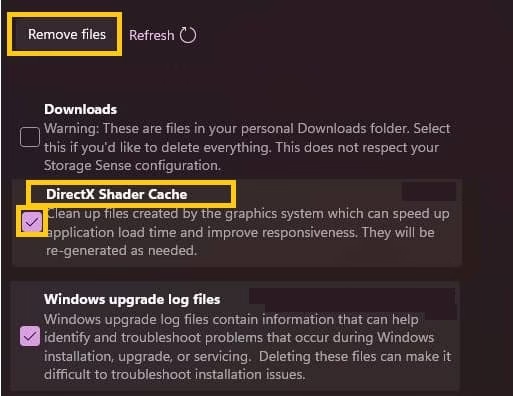
- Confirm your choice and wait for the deletion to complete.
- Restart your PC to allow the system to initialize new cache files.
Many people appreciate this route because it shows exactly how much space each category uses. Regular checks here prevent the cache from ballooning unnoticed.
Also know: How to Reset Your PC for a Fresh Start on Windows
3. Manually Delete Shader Cache Folders
For a more thorough clean, especially with NVIDIA graphics cards, manual deletion reaches deeper locations. This technique targets specific directories where cache files accumulate.
It becomes particularly useful when Disk Cleanup misses stubborn files or after major driver changes. Proceed with care to avoid deleting unrelated data.
- Press Windows key + R to open the Run dialog.
- Type %localappdata% and press Enter to open the Local folder.

- Locate and open the NVIDIA folder if present.

- Inside it, find DXCache and GLCache folders.
- Select all contents inside each folder and delete them permanently.
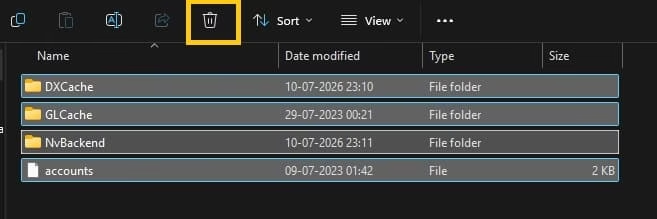
- Also check the NVIDIA Corporation folder for NV_Cache and clear its contents.
- For AMD users, look for corresponding folders like AMD or GPUCache in the same Local directory.
- Empty the Recycle Bin afterward and restart your system.
Take time to verify folder paths before deleting. Windows recreates these directories automatically when needed, so you lose nothing permanent. This method often resolves persistent stutters that other approaches miss.
4. Disable Shader Cache in Graphics Control Panel
NVIDIA users gain extra control through the dedicated control panel. Disabling the cache temporarily forces a complete refresh upon re-enabling.
This advanced step helps when corrupted cache files resist normal deletion. It ensures old data gets fully purged before new compilation begins.
- Right-click on your desktop and select NVIDIA Control Panel.
- Go to Manage 3D Settings on the left side.
- Find Shader Cache Size in the global settings list.
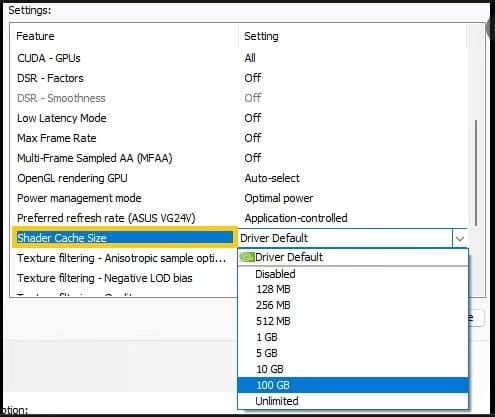
- Change it to Disabled and apply the changes.
- Restart your computer completely.
- After reboot, return to the same setting and set it back to Driver Default or a preferred size like 10GB or higher.
- Now perform one of the previous cleanup methods to remove remaining files.
- Restart once more to finalize the process.
This sequence prevents conflicts during deletion. Gamers dealing with frequent shader compilation stutters often report noticeable improvements afterward.
5. Additional Tips for AMD and Intel Graphics Users
Different hardware brands store cache files in slightly varied locations. Tailoring your approach yields better results.
AMD users can access Radeon Software to manage related settings. Intel integrated graphics rely more on Windows tools but still benefit from manual folder cleaning.
- Open Radeon Software for AMD cards and explore graphics profiles for cache-related options.
- For Intel, focus primarily on Storage settings and manual AppData cleanup.
- Update your graphics drivers from official sources before and after clearing cache.
- Monitor disk space usage over the following days as new shaders compile during gameplay.
- Consider scheduling cache cleanup every few months or after big game updates.
Combining these habits keeps your system responsive. Different GPUs handle shader compilation uniquely, so experiment to find your ideal routine.
Also know: Easy Ways to Sync Refresh Rates for Smooth Playback Windows 11/10
When and Why to Clear the Cache Regularly
Understanding the purpose behind these steps helps you decide frequency. Shader caches improve load times by storing pre-processed graphics instructions. Over months, however, they accumulate outdated or damaged entries.
Clearing them reduces micro-stutters, especially in newer titles with heavy shader demands. It also frees storage on smaller SSDs where every gigabyte counts.
Avoid clearing too often, though. Let the cache rebuild naturally between major cleanups. If you notice sudden performance drops after driver updates, a targeted clear frequently solves the issue without deeper troubleshooting.
Always back up important data before extensive system changes, even though these methods carry low risk. Test one game thoroughly after cleaning to confirm positive effects.
Conclusion
Clearing the DirectX Shader Cache offers a simple yet effective way to refresh your Windows graphics performance. Whether you choose the quick Disk Cleanup method or dive into manual folder deletion, these techniques help eliminate stutters and reclaim space.
Remember that your system rebuilds the cache intelligently as you play. Stay consistent with driver updates and occasional maintenance for the best experience. If problems persist after trying these steps, consider checking for hardware issues or seeking community support specific to your graphics card.
At Avsoftlab, we aim to deliver practical tech advice that empowers users. Try these methods today and enjoy smoother gaming sessions ahead. Feel free to share your results or ask questions below.
FAQs
Q1: Is it safe to delete the DirectX Shader Cache?
Yes, completely safe. Windows and your games automatically rebuild the necessary files when you launch applications. You might notice slightly longer initial load times as it repopulates.
Q2: How often should I clear the DirectX Shader Cache?
Every two to three months works well for most users. Clear it more frequently if you experience stutters, install new games often, or update graphics drivers regularly.
Q3: Will clearing the cache delete my game saves or settings?
No. The shader cache only contains temporary graphics data. Your saved progress and configurations remain untouched.
Q4: Why does the shader cache grow so large?
Modern games use complex shaders for realistic effects. Each title adds its own files, which accumulate quickly on systems with many installed games.
Q5: What should I do if I cannot find the DirectX Shader Cache option?
Run Disk Cleanup as administrator or use the Storage settings in Windows. Manual folder deletion always serves as a reliable alternative.
Q6: Does clearing the cache improve FPS?
It can reduce stuttering and improve frame consistency by removing corrupted entries. Actual raw FPS gains vary depending on the game and hardware.
Q7: Are there differences for NVIDIA versus AMD users?
Yes. NVIDIA offers more control through its Control Panel. AMD users rely more on Radeon Software and Windows tools, but both benefit from the same core cleaning principles.

Amanda Starc
Amanda is a dedicated technical web content writer with a passion for transforming complex ideas into compelling and accessible online narratives. With a background in web development, and digital Marketing I bring a unique blend of technical expertise and creative storytelling to the digital domain.
