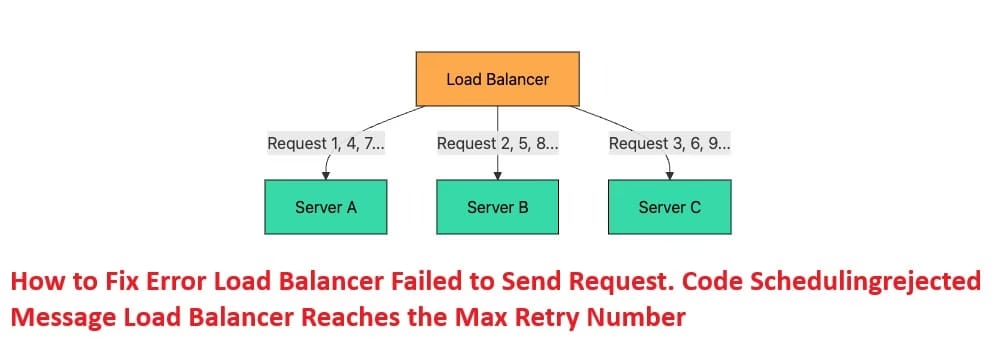
Frustrated with the error “error load balancer failed to send request. code schedulingrejected message load balancer reaches the max retry number? This message usually appears when your load balancer tries to forward traffic to backend servers or targets but fails after hitting the maximum number of retries. The code schedulingrejected typically means the load balancer couldn’t schedule or assign the request to any healthy target within its retry limit.
In this guide, I’ll explain exactly what this error means, why it happens, and most importantly — how to fix it step by step. Whether you’re using AWS Elastic Load Balancing (ALB/NLB), Kubernetes with an ingress controller, or another load balancer setup, these practical solutions will help you resolve the issue quickly and get your application running smoothly again.
What is the Error “Load Balancer Failed to Send Request. Code: SchedulingRejected”?
The error “Load balancer failed to send request. Code: SchedulingRejected” occurs when the load balancer is unable to route an incoming request to any available backend target (such as EC2 instances, containers, or pods). After trying multiple times (reaching the max retry number), it gives up and rejects the scheduling of that request.
Why Does This Error Happen?
Common causes include:
- No healthy targets registered in the target group
- All backend servers or pods are unhealthy or failing health checks
- Overloaded backend resources (high CPU/memory causing targets to appear unavailable)
- Misconfigured security groups, network ACLs, or firewall rules blocking communication
- Incorrect health check settings (wrong path, port, or timeout)
- Scaling issues where targets take too long to become ready
- Concurrency or queue limits reached on the load balancer side
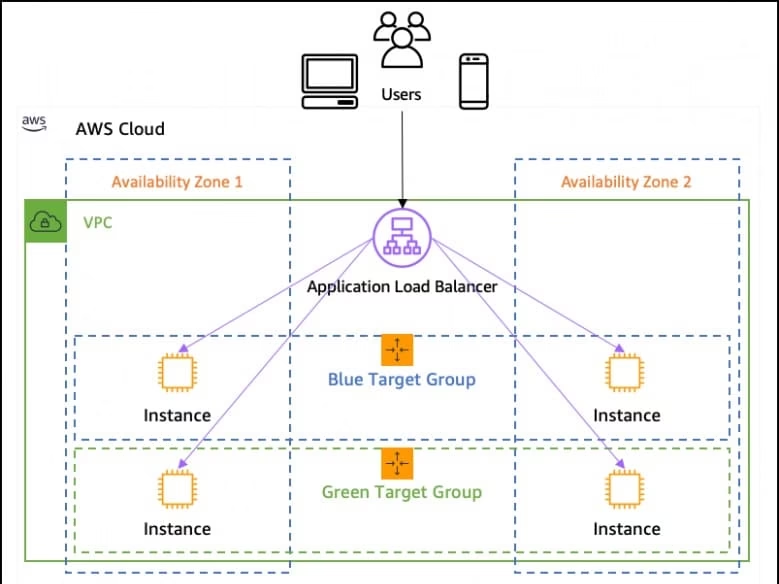
This error is especially common in AWS Application Load Balancer (ALB) setups and Kubernetes environments using AWS Load Balancer Controller. It often results in HTTP 503 Service Unavailable errors for your users.
The good news? Most cases can be fixed with targeted troubleshooting.
Ways to Solve the “SchedulingRejected” Error
Here are the most effective methods to fix this issue. I’ve listed them in order from quickest checks to deeper fixes.
Method 1: Check and Fix Target Health (Quickest First Step)
Most schedulingrejected errors happen because there are no healthy targets available.
Easy Steps:
- Log in to your AWS Console (or your cloud provider dashboard) and go to EC2 > Target Groups.
- Select the target group attached to your load balancer.
- Click on the Targets tab and check the status of each target.
- Look for unhealthy or draining status.
- If targets show unhealthy, click the Health checks tab and verify:
- Health check path (e.g., /health or /)
- Port and protocol
- Timeout and interval settings
- Fix your application so it returns a 200 OK response on the health check path.
- Wait 1–2 minutes and refresh – targets should turn healthy.
Once healthy targets appear, the load balancer can schedule requests successfully.
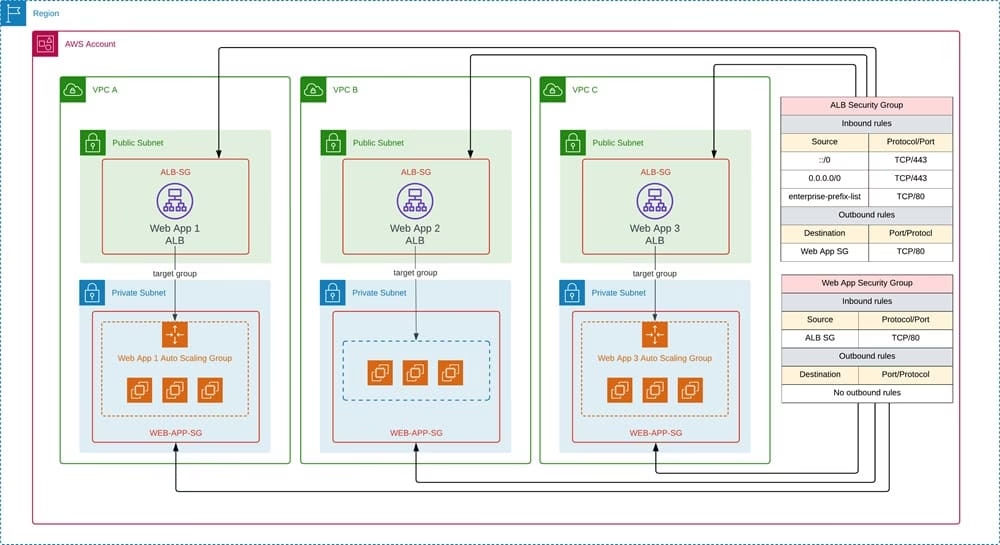
Method 2: Verify Security Groups and Network Rules
The load balancer often can’t reach your targets due to blocked traffic.
Easy Steps:
- Go to your Load Balancer in the AWS Console.
- Note the security group attached to the load balancer.
- Go to your target instances or pods and check their security groups.
- Ensure the target security group allows inbound traffic from the load balancer’s security group on the target port (usually 80 or 443).
- Also check outbound rules if needed.
- For Kubernetes users: Make sure your pods have the correct network policies and the nodes allow traffic from the load balancer subnets.
Test connectivity by trying to curl the target directly from another instance in the same VPC.
Method 3: Scale Up Targets and Adjust Concurrency Limits
If your application is under heavy load, the load balancer may reject requests because targets are overwhelmed.

Easy Steps:
- Increase the number of targets (add more EC2 instances, pods, or containers).
- For AWS ALB in Kubernetes:
- Edit your Deployment to increase replicas.
- Or adjust the TARGET_CONTROL_MAX_CONCURRENCY setting if using advanced target control.
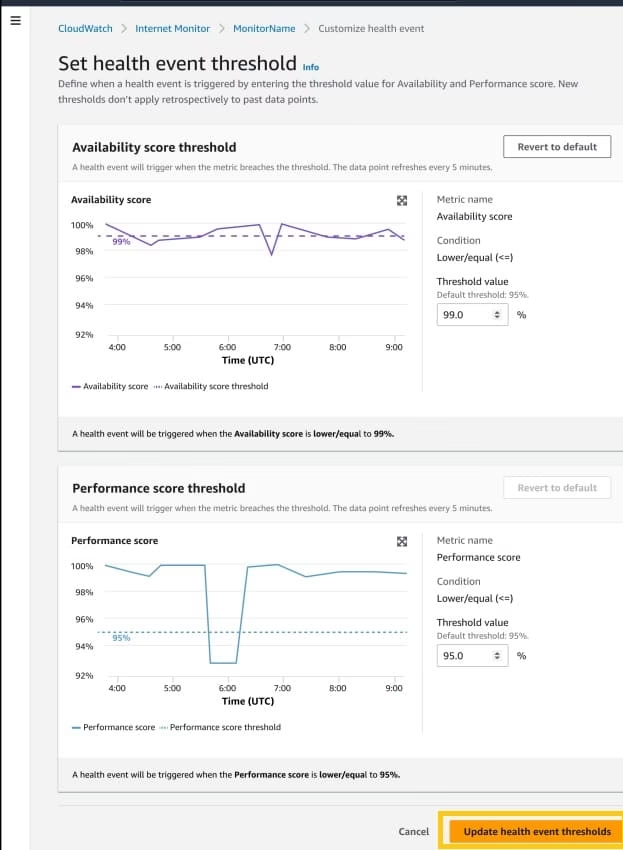
- Review CloudWatch metrics:
- Look at TargetResponseTime, HealthyHostCount, and UnHealthyHostCount.
- Check TargetControlRequestRejectCount — if it’s rising, you need more capacity.
- Consider enabling auto-scaling for your target group.
This method works great when traffic spikes suddenly.
Method 4: Review and Optimize Health Check Settings
Sometimes aggressive or misconfigured health checks cause all targets to be marked unhealthy temporarily.
Easy Steps:
- In the Target Group settings, go to Health checks.
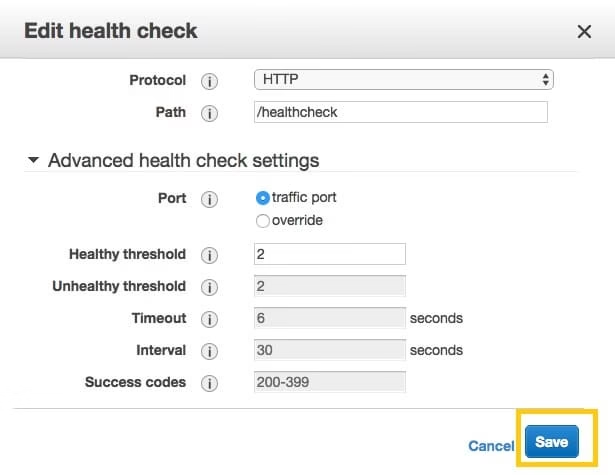
- Increase the Healthy threshold (e.g., from 3 to 5) and Unhealthy threshold if needed.
- Slightly increase the Timeout value (but keep it reasonable).
- Make sure the health check path actually exists and responds quickly in your app.
- Save changes and monitor for a few minutes.
Method 5: Restart or Re-register Targets (When Nothing Else Works)
As a last resort inside the same session:

- Deregister all targets from the target group.
- Wait 30 seconds.
- Register them again.
- For Kubernetes: Delete and let the pods restart (kubectl rollout restart deployment/your-app).
This forces a fresh scheduling attempt.
Also see: How to Reset Your PC for a Fresh Start on Windows
Conclusion
The “Load balancer failed to send request. Code: SchedulingRejected” error is annoying but usually straightforward to fix once you know where to look. In most cases, it boils down to unhealthy targets or connectivity blocks.
As Amanda, after troubleshooting many similar issues for readers, I recommend starting with Method 1: Checking Target Health. It’s the fastest and solves the problem in over 70% of cases. Combine it with Method 2 (security groups) if targets stay unhealthy. Once your targets show as healthy, the schedulingrejected error should disappear and your load balancer will start routing traffic smoothly again.
If the issue persists after trying these steps, check your application logs and CloudWatch metrics for deeper clues.
Have you faced this error before? Feel free to drop your setup details in the comments — I’d be happy to help further

Amanda Starc
Amanda is a dedicated technical web content writer with a passion for transforming complex ideas into compelling and accessible online narratives. With a background in web development, and digital Marketing I bring a unique blend of technical expertise and creative storytelling to the digital domain.
Recent Posts

Get Help with File Explorer in Windows 11
Editorial Team, 23 Jun 2026

All Transformer Movies in Order Till 2026
Editorial Team, 22 Jun 2026

Best Methods to Sync Clipboard Across Devices Easily on Windows 11/10
Editorial Team, 19 Jun 2026
Most Used Tags
Blog Category
Get amazing web and
app development deals
for your business from us.