Are you tired of surprise data overage charges or slow internet speeds because certain apps quietly devour your bandwidth? Many users search for “Finding Your App-Wise Data Usage in Windows” when they notice their connection lagging or their monthly data cap vanishing faster than expected. Whether you’re on a metered plan, sharing a limited home network, or simply curious about which programs eat the most data, understanding per-app consumption gives you control.
In this guide, we’ll walk you through practical ways to monitor app-specific data usage on Windows 11 and Windows 10. You’ll learn simple built-in methods that require no extra software, plus options for setting limits to prevent any single app from hogging resources. By the end, you’ll know exactly where your data goes and how to manage it wisely. Let’s dive in and make your connection work smarter for you.
How to Find App-Wise Data Usage in Windows 11 and 10
Tracking data usage per app helps pinpoint bandwidth hogs like streaming services, cloud sync tools, or background updaters. Windows offers several native tools for this. You can view historical data over days or weeks, monitor live activity, and dig deeper into network processes. These methods work reliably on both Windows 11 and 10, though the interface might look slightly different.
Here are three effective ways to check app-wise data usage. Each approach suits different needs, from quick overviews to real-time troubleshooting.
1. Using Windows Settings for Historical Data Usage
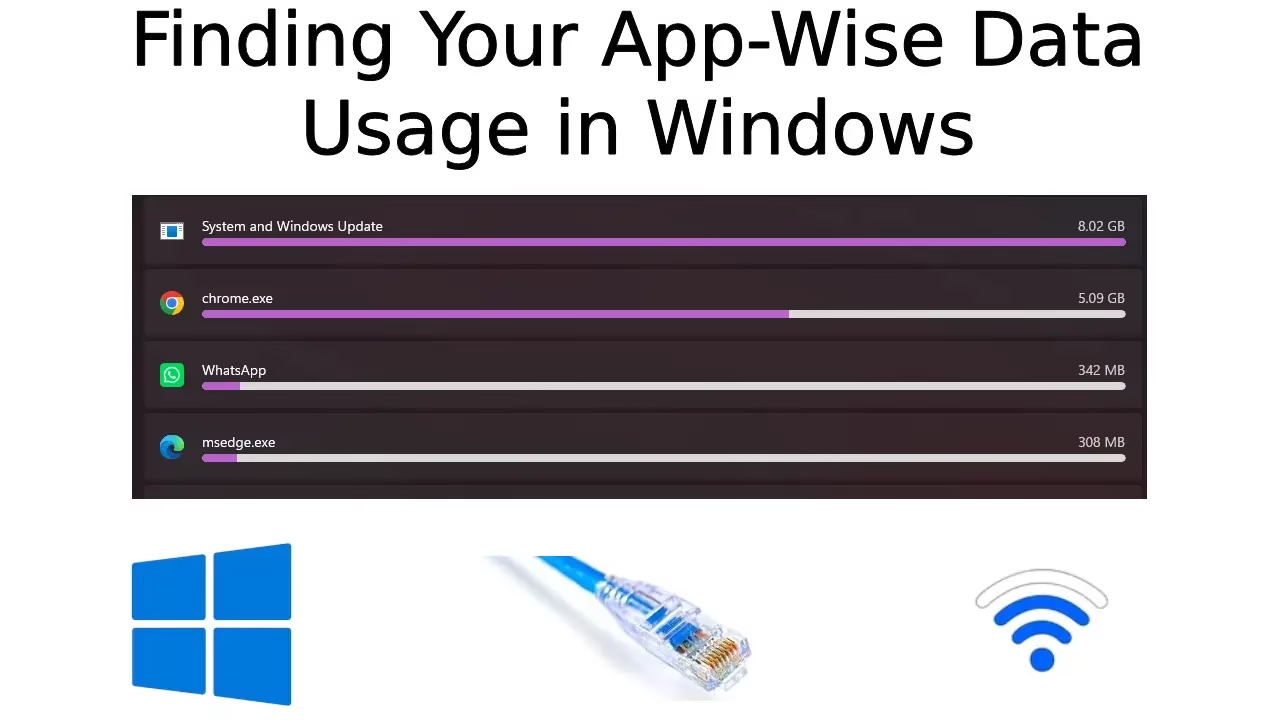
This built-in feature shows a clear breakdown of data used by apps over the last 30 days. It’s the easiest starting point for most people.
- Press Win + I to open the Settings app.
- Click on Network & internet from the left sidebar.
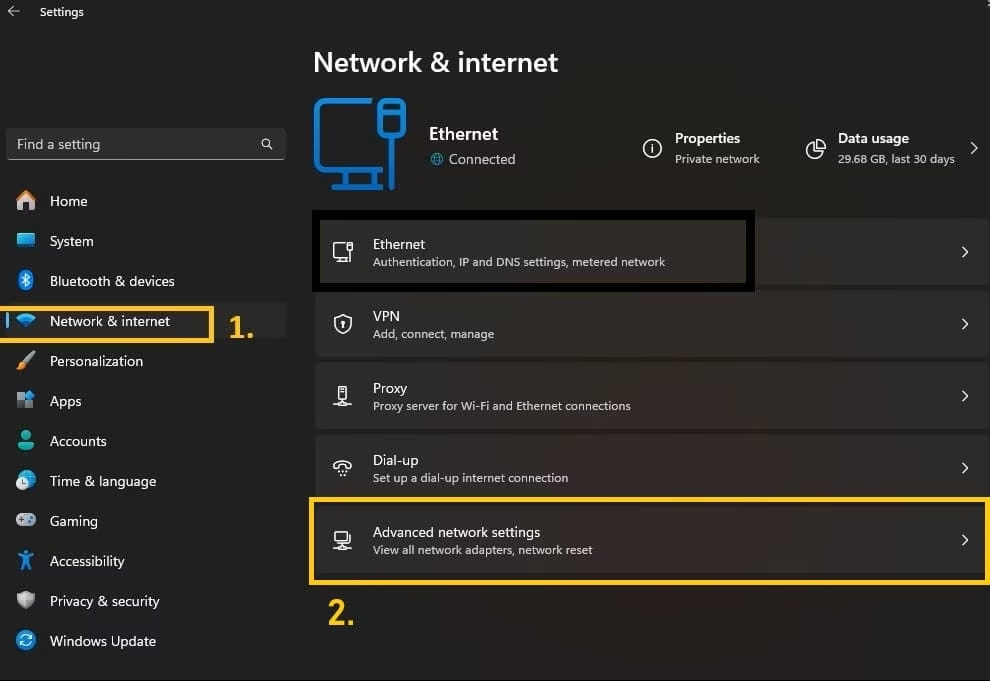
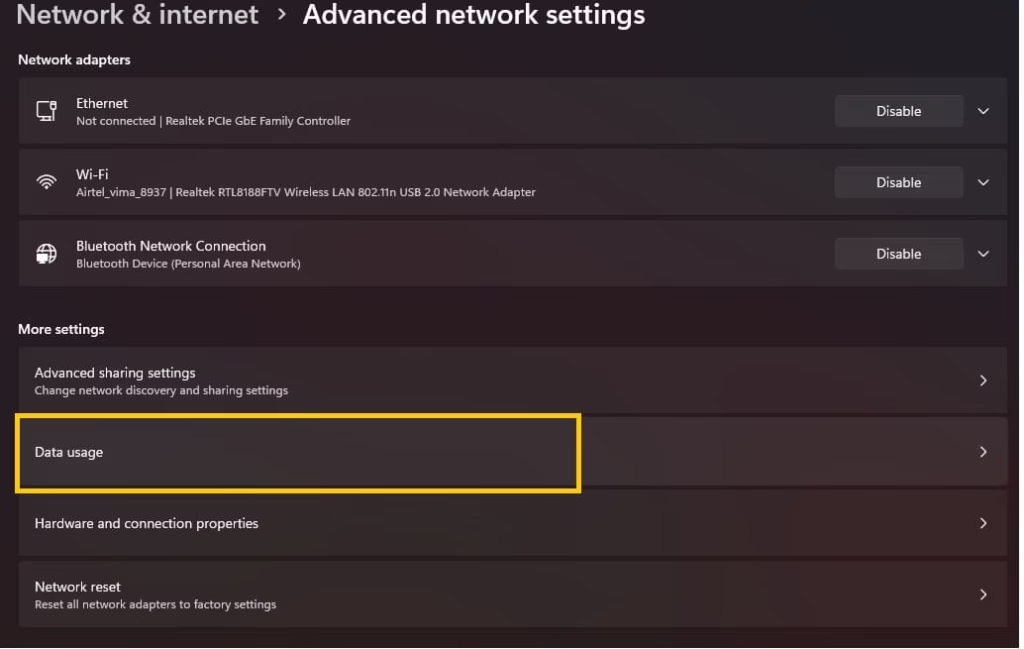
- Scroll down and select Advanced network settings.
- Click Data usage on the right side.
- Choose your active connection (Wi-Fi or Ethernet) if prompted.
- Scroll through the list of apps to see their data consumption in MB or GB. You can filter by time periods like the last 24 hours, 7 days, or 30 days in some views.
- Note the total usage at the top for a quick summary.
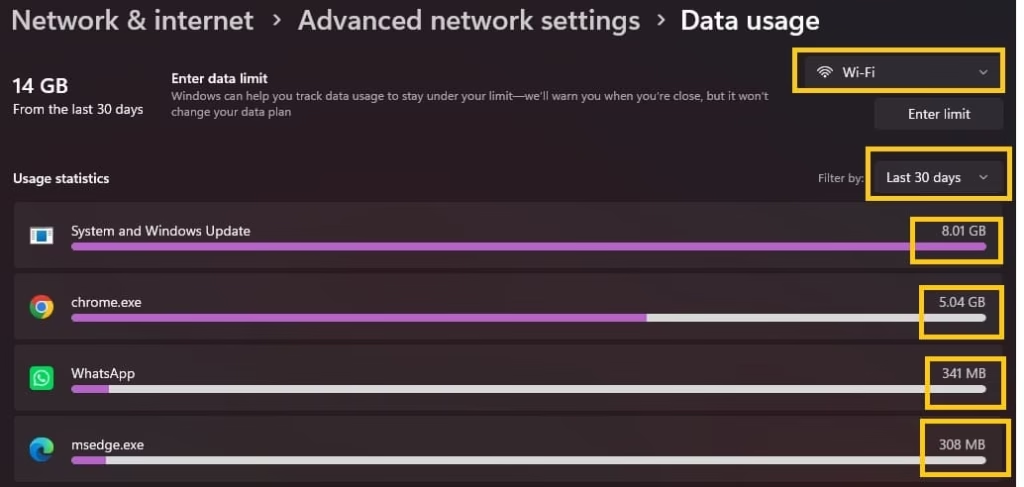
This view separates sent and received data in many cases and helps identify patterns over time. For example, you might discover that your browser or a video app accounts for most of your usage. Refresh the page after heavy activity to see updates.
2. Live View in Task Manager
Task Manager offers a real-time snapshot, perfect for spotting apps actively using the network right now.
- Press Ctrl + Shift + Esc to launch Task Manager quickly.
- Go to the Processes tab.
- Look for the Network column. Click its header to sort apps by current usage.
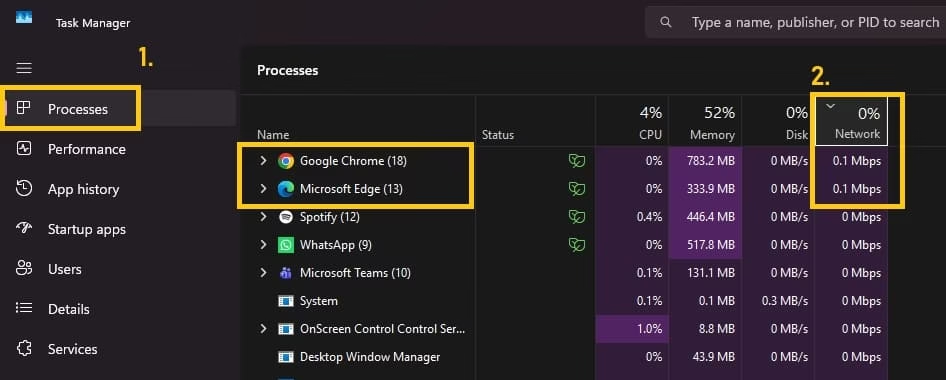
- Observe which processes show higher percentages or activity. Background tasks like OneDrive or antivirus updates often appear here.
- For more detail, switch to the Performance tab, select your network adapter, and monitor overall graphs while cross-referencing with processes.
This method shines during troubleshooting. If downloads slow down suddenly, check Task Manager to catch the culprit instantly. Keep in mind it focuses on current activity rather than long-term totals.
3. Resource Monitor for Detailed Insights
Resource Monitor goes deeper, revealing network activity for every process, including system ones.
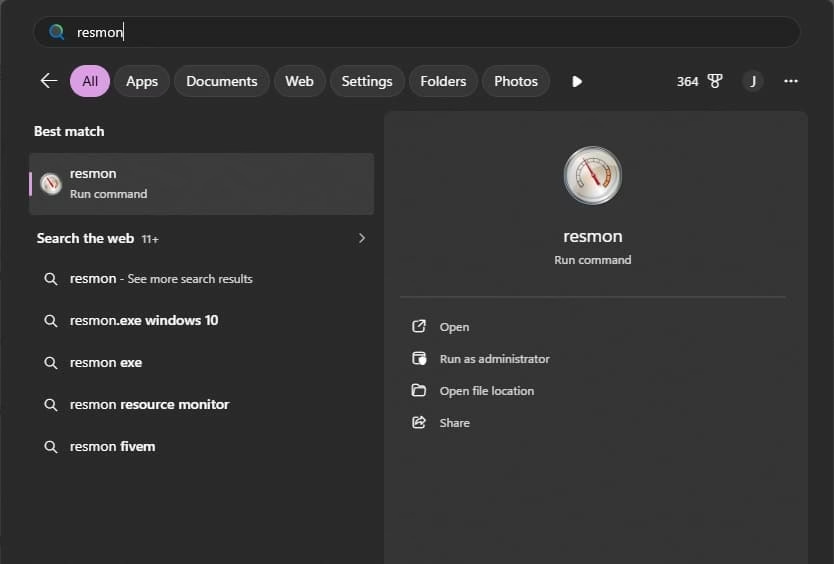
- Open Task Manager as above, then click Open Resource Monitor at the bottom of the Performance tab. Or search for “resmon” in the Start menu.
- Switch to the Network tab.
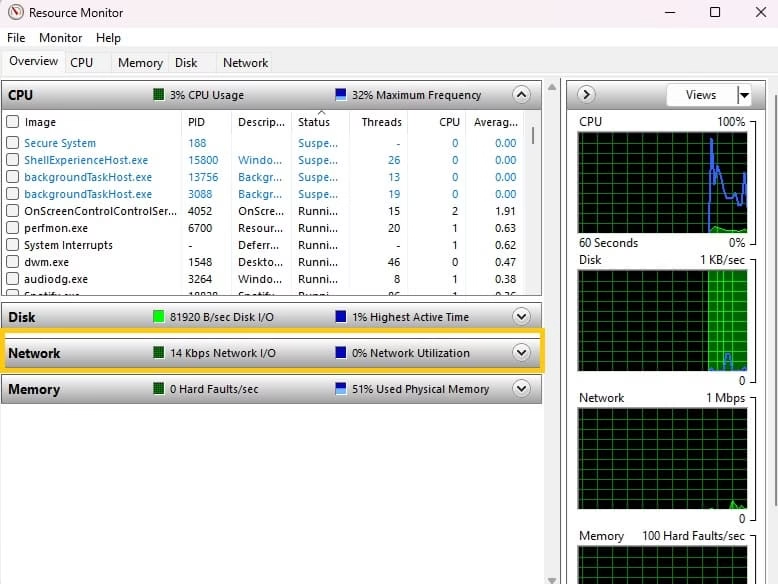
- Expand Processes with Network Activity to see a list of apps and their current send/receive rates.
- Check sections like TCP Connections for details on remote addresses and ports each app connects to.
- Use the search box at the top to filter for a specific app name.
Resource Monitor helps when you need context, such as which websites or servers an app is talking to. It’s invaluable for advanced users investigating mysterious traffic.
These three tools together cover most scenarios. Start with Settings for overview, use Task Manager for speed, and turn to Resource Monitor when you need precision.
Also know: How to Get Help with File Explorer in Windows 11
How to Set App-Wise Data Usage Limits in Windows 11 & 10
Knowing your usage is one thing. Controlling it prevents problems before they start. Windows includes options for basic limits, while third-party tools add finer per-app control. These features help on metered connections or shared networks.
Setting limits encourages mindful usage. You can restrict background data, cap monthly totals, or throttle specific apps. This section covers straightforward methods that deliver results without complexity.
1. Enable Metered Connection to Reduce Overall Data Use
Metered connections tell Windows to limit automatic updates and background activity.
- Open Settings with Win + I.
- Navigate to Network & internet > select your Wi-Fi or Ethernet connection.
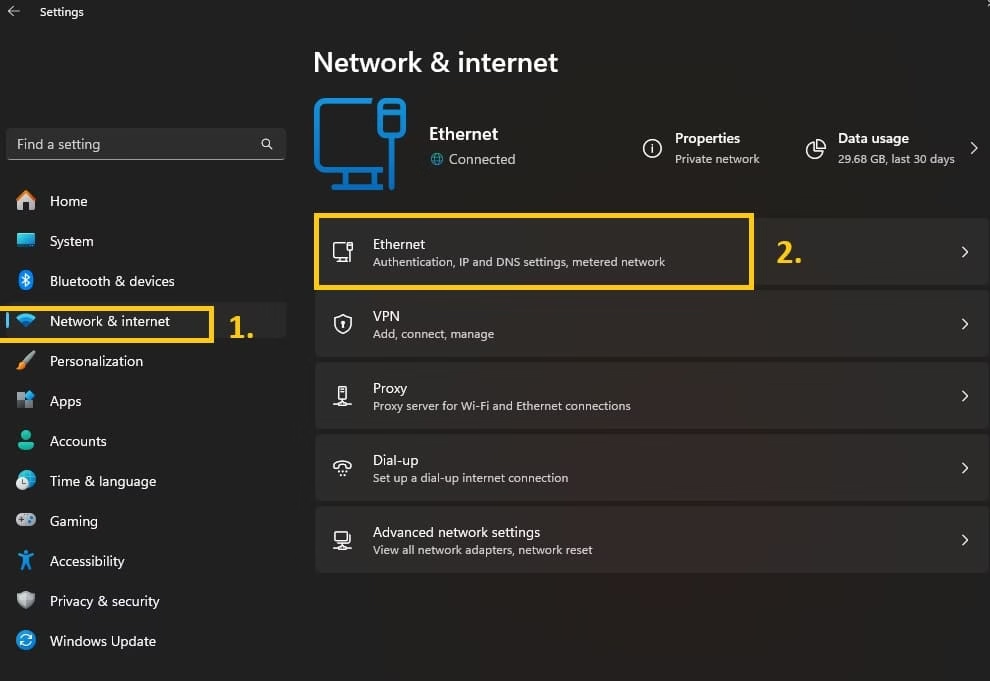
- Click Properties for that network.
- Toggle Set as metered connection to On.

- Return to Data usage settings and explore restrictions for background apps.
This simple switch reduces data from Windows Update, app sync, and more. It’s ideal for mobile hotspots or limited plans. Remember to turn it off on unlimited networks to restore full functionality.
2. Set a Monthly Data Limit
Windows lets you define a cap and receive warnings as you approach it.
- Go to Settings > Network & internet > Advanced network settings > Data usage.
- Select your connection.
- Click Enter limit under the Data limit section.
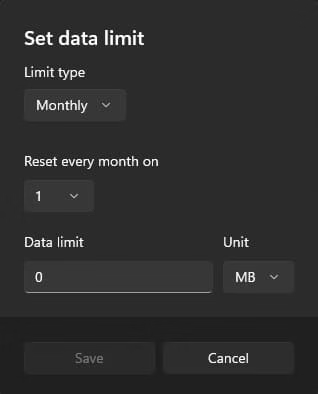
- Choose the limit type: monthly, one-time, or unlimited with policy.
- Enter the data amount (in MB or GB) and set the reset date or billing cycle start.
- Save the changes.
The system tracks progress and can notify you. Combine this with metered mode for stronger control. Check usage regularly to adjust as habits change.
3. Use Third-Party Tools Like NetBalancer for Per-App Control
For true app-wise limits, tools like NetBalancer provide granular bandwidth management.

NetBalancer lets you set download and upload speed limits or priorities for individual processes. Install it from the official site, launch the app, and select processes from the list. Assign priorities such as High, Normal, or Low, or set exact rate limits in KB/s. It works in real time and includes detailed statistics.
Other options like GlassWire offer monitoring with alerts. Choose reputable tools and review permissions carefully. These shine when Windows’ built-in features feel too broad. Test them during non-critical times to learn the interface.
Experiment with combinations. For instance, set a system-wide limit in Windows and fine-tune heavy apps with third-party software.
Also know: How to Customize Notifications and Quick Settings Windows 11
Conclusion
Mastering app-wise data usage transforms how you experience Windows 11 and 10. No more guessing why your internet feels sluggish or why bills spike unexpectedly. With built-in tools like Settings, Task Manager, and Resource Monitor, plus limit options and helpful third-party apps, you stay in charge.
Take time this week to check your own usage patterns. Small adjustments, like pausing syncs or scheduling updates, add up to noticeable savings. Stay curious about your digital habits. If issues persist, explore community forums for device-specific tips. Your connection will thank you with smoother performance and fewer surprises.

Amanda Starc
Amanda is a dedicated technical web content writer with a passion for transforming complex ideas into compelling and accessible online narratives. With a background in web development, and digital Marketing I bring a unique blend of technical expertise and creative storytelling to the digital domain.
Recent Posts

Finding Your App-Wise Data Usage in Windows 11 & 10
Editorial Team, 01 Jul 2026

Customize Notifications and Quick Settings Windows 11
Editorial Team, 25 Jun 2026

How to Get Help with File Explorer in Windows 11
Editorial Team, 23 Jun 2026
Most Used Tags
Blog Category
- Alternatives
- Best
- Games
- How to
- iOS
- Metaverse
- Mobile App Development
- Reviews
- Uncategorized
- Web Development
Get amazing web and
app development deals
for your business from us.