Struggling with a mouse cursor that flies across the screen or crawls too slowly? Mastering how to adjust the mouse pointer speed on Windows is one of the simplest yet most effective ways to boost your daily comfort and productivity. Whether you’re a student juggling assignments, a professional handling spreadsheets, a designer working on detailed projects, or a gamer needing quick reflexes, the right pointer speed makes everything feel natural and effortless.
At Avsoftlab, we help users get the most out of their Windows devices. In this comprehensive guide, we’ll share the best, easiest, and most reliable techniques to adjust your mouse pointer speed on any Windows PC or laptop — including Windows 10 and Windows 11. These methods require no third-party software and work on both desktop computers and laptops.
You’ll learn three proven ways: the modern Windows Settings approach, the classic Advanced Mouse Settings, and the super-fast main.cpl trick that power users love. We’ll also cover how to choose the ideal speed for different activities, plus extra tips to troubleshoot common issues and fine-tune your setup for maximum efficiency.
By the end of this article, you’ll have complete control over your mouse pointer, helping you work faster, reduce hand strain, and enjoy a smoother Windows experience every single day.
Easy and Quick Methods to Adjust Mouse Pointer Speed on Windows Devices
Windows gives you multiple built-in options to customize mouse pointer speed. The good news? All of them are straightforward and take just a few clicks. Whether you prefer a clean modern interface or quick keyboard shortcuts, there’s a method for everyone. These approaches are safe, reversible, and don’t require any technical expertise.
Let’s explore each method in detail so you can pick the one that suits your style best.
1. Windows Settings (Easiest Method for Beginners)
This is the most user-friendly way to adjust the mouse pointer speed on Windows, especially if you’re using Windows 11. Microsoft designed this path to be clean and visual, allowing you to see changes in real time.
Why this method is great: It’s intuitive, shows instant feedback, and integrates perfectly with the latest Windows design. Perfect for new users or anyone who wants to avoid older control panels.
Step-by-step guide:
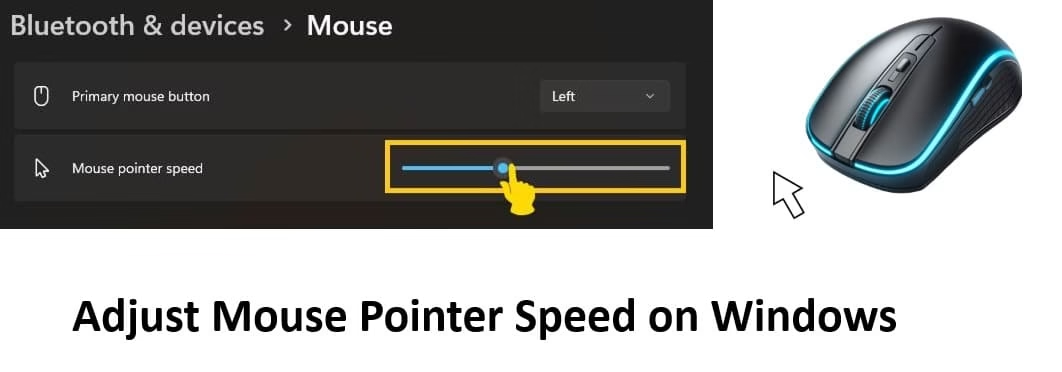
- Press the Windows key + I together on your keyboard. This instantly opens the Settings app.
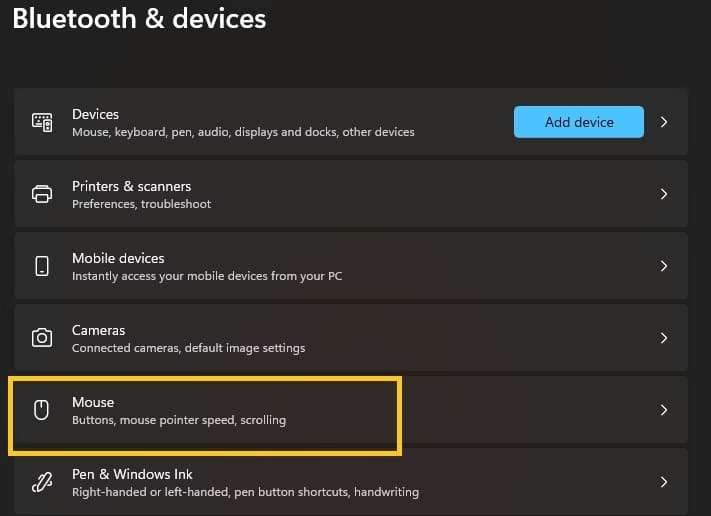
- In the left sidebar, click on Bluetooth & devices. (On Windows 10, it will say Devices).

- Now click Mouse from the list of options.
- Look for the section labeled Mouse pointer speed.
- You’ll see a horizontal slider. Drag it to the left to make your pointer slower and more precise. Drag it to the right for faster movement.
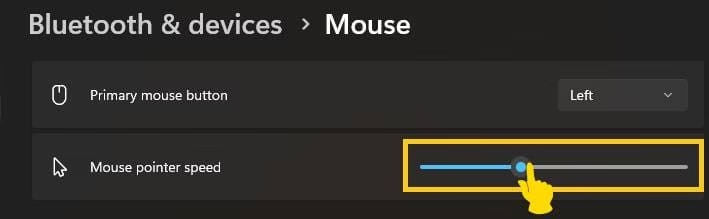
- As you move the slider, test the speed immediately by moving your mouse around your screen.
- Once you’re satisfied, simply close the Settings window. Your changes are saved automatically.
Pro tips: Many users find the middle position (around 50-60%) works well for general use. If you use a high-DPI gaming mouse, you might need to lower the Windows speed slider to avoid overshooting. This method also works great on touchpad-enabled laptops.
2. Advanced Mouse Settings (For More Control)
Sometimes you need more than just a basic slider. This method opens the classic Mouse Properties window, giving you additional options along with pointer speed adjustment.
Why use this method? It offers finer control and extra features like pointer precision, trails, and visibility settings that many professionals appreciate.
Step-by-step guide:
- Open Settings using Windows key + I.
- Navigate to Bluetooth & devices > Mouse.
- Scroll down the page until you see Additional mouse settings and click it.
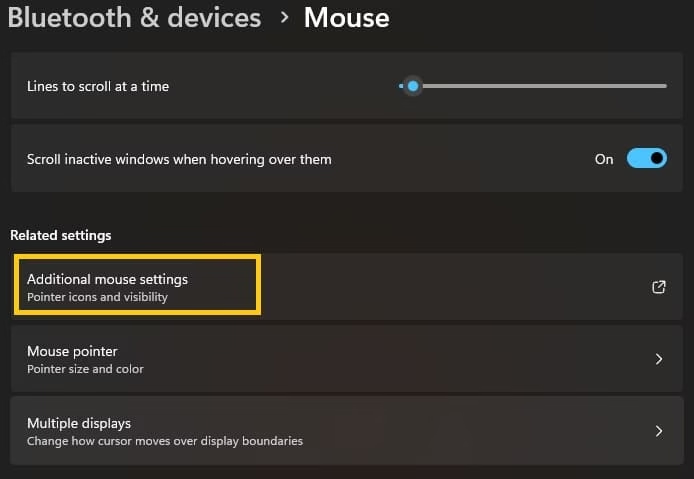
- The traditional Mouse Properties window will appear.
- Click on the Pointer Options tab at the top.
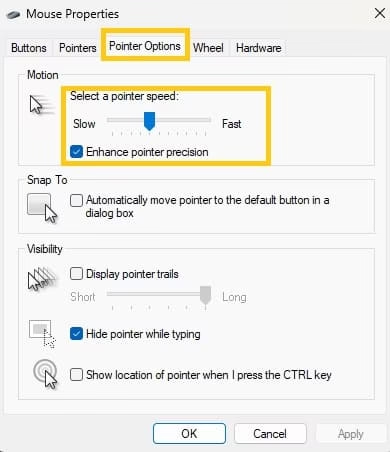
- In the Motion section, you’ll find the Select a pointer speed slider.
- Move the slider left for slower, more accurate control or right for quicker response.
- Below the slider, you’ll see the option Enhance pointer precision. This is usually checked by default and helps with accurate tracking. Keep it enabled for most tasks, or disable it if you prefer raw speed (common among some gamers).
- Click Apply, then click OK to save your changes.
This window also lets you customize pointer appearance, double-click speed, and more — making it a one-stop solution for complete mouse customization.
Also know: How to View Clipboard History in Windows 11
3. Quickest Method Using Control Panel (main.cpl)
This is the favorite method of many experienced Windows users because it skips several clicks and gets you there instantly.
Why this is the fastest: One keyboard shortcut opens the exact settings window you need in seconds.
Step-by-step guide:
- Press the Windows key + R to open the Run dialog box.
- Type main.cpl exactly as shown and press Enter.
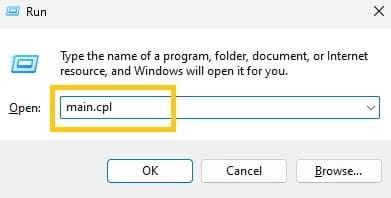
- The Mouse Properties window opens immediately.
- Switch to the Pointer Options tab.
- Locate the Select a pointer speed slider under the Motion section.
- Adjust the slider according to your preference — left for slower, right for faster.
- Optionally, adjust the Enhance pointer precision checkbox.
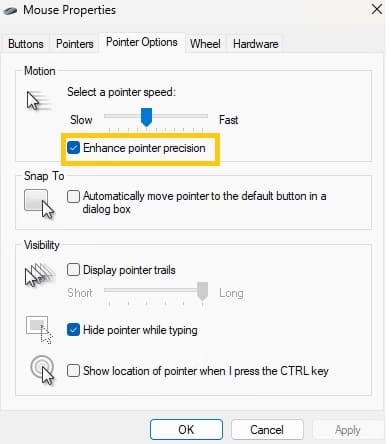
- Click Apply and then OK.
Bonus advantage: This method works consistently across Windows 10 and Windows 11. You can create a desktop shortcut for main.cpl if you adjust your mouse speed frequently.
All three methods achieve the same core result — changing how fast your cursor moves across the screen. Feel free to try them all and see which workflow you prefer.
Ideal Mouse Pointer Speed for Different Scenarios
There’s no universal “perfect” speed. The best setting depends on your specific tasks, mouse type, screen resolution, and personal comfort. Here’s a helpful breakdown to guide you:
- Office Work and Everyday Browsing For typing reports, browsing the web, or using Microsoft Office, aim for a medium speed — usually around 50-65% on the slider. This balance gives you enough speed to move across large screens without losing control when clicking small buttons.
- Graphic Design and Photo/Video Editing Designers and editors benefit from slower speeds. Try 30-45% on the slider. Slower movement allows for pixel-perfect precision when working in tools like Photoshop, Illustrator, or Premiere Pro.
- Gaming Gamers often prefer faster speeds (70-90%), especially in fast-paced games like FPS titles. However, this also depends heavily on your mouse DPI settings. Many competitive gamers combine a higher Windows pointer speed with lower in-game sensitivity.
- Laptop Users with Touchpad Laptop touchpads often feel different from external mice. Start at 55-70% and adjust based on how comfortable your wrist feels after 30 minutes of use.
- Multiple Monitors Setup If you use dual or triple monitors, you may want slightly faster speeds so you can move between screens quickly without fatigue.
How to find your perfect speed:
- Set the slider to middle position.
- Use your computer normally for 10-15 minutes.
- Make small adjustments and test again.
- Pay attention to hand and wrist comfort — the right speed should feel effortless.
Remember, your ideal speed can change over time as you get used to it or switch between different mice.
Also know: How to Play Roblox Games on Now.gg without Downloading
Why Mouse Pointer Speed Matters for Productivity and Health
Many people underestimate how much a poorly adjusted mouse affects their workflow. Too fast, and you’ll overshoot targets, leading to frustration and wasted time. Too slow, and simple tasks take longer, causing fatigue.
Proper adjustment reduces repetitive strain on your wrist and improves overall accuracy. This small change can lower the risk of discomfort during long work sessions. Professionals who spend 6+ hours daily on computers report noticeable improvements after optimizing pointer speed.
Additional Tips and Troubleshooting
- Mouse feels laggy? Make sure your mouse drivers are updated through Device Manager.
- Using a gaming mouse? Check its dedicated software (Razer Synapse, Logitech G Hub, etc.) for DPI settings. Combine it with Windows pointer speed for best results.
- Touchpad issues on laptops? Go to Settings > Devices > Touchpad and adjust sensitivity separately.
- Changes not applying? Restart your PC after adjusting settings.
- Want even more customization? Consider free tools like Custom Cursor or Mouse Manager, but built-in options are usually sufficient.
Conclusion
Learning how to adjust the mouse pointer speed on Windows is a small tweak that delivers big improvements in comfort, accuracy, and productivity. Whether you prefer the simple Settings slider, the detailed Pointer Options, or the lightning-fast main.cpl method, you now have all the tools you need to create a personalized experience.
Take a few minutes today to experiment with different speeds. Listen to your body and workflow — the right setting should feel completely natural. Small optimizations like this are what turn a good Windows PC or laptop into a great one.
At Avsoftlab, we’re committed to helping you make the most of your technology. Try these methods and enjoy smoother, more enjoyable computing every day.

Amanda Starc
Amanda is a dedicated technical web content writer with a passion for transforming complex ideas into compelling and accessible online narratives. With a background in web development, and digital Marketing I bring a unique blend of technical expertise and creative storytelling to the digital domain.
Recent Posts

Where to Watch Obsession Movie in 2026: Top Picks
Editorial Team, 24 Jul 2026
Most Used Tags
Get amazing web and
app development deals
for your business from us.